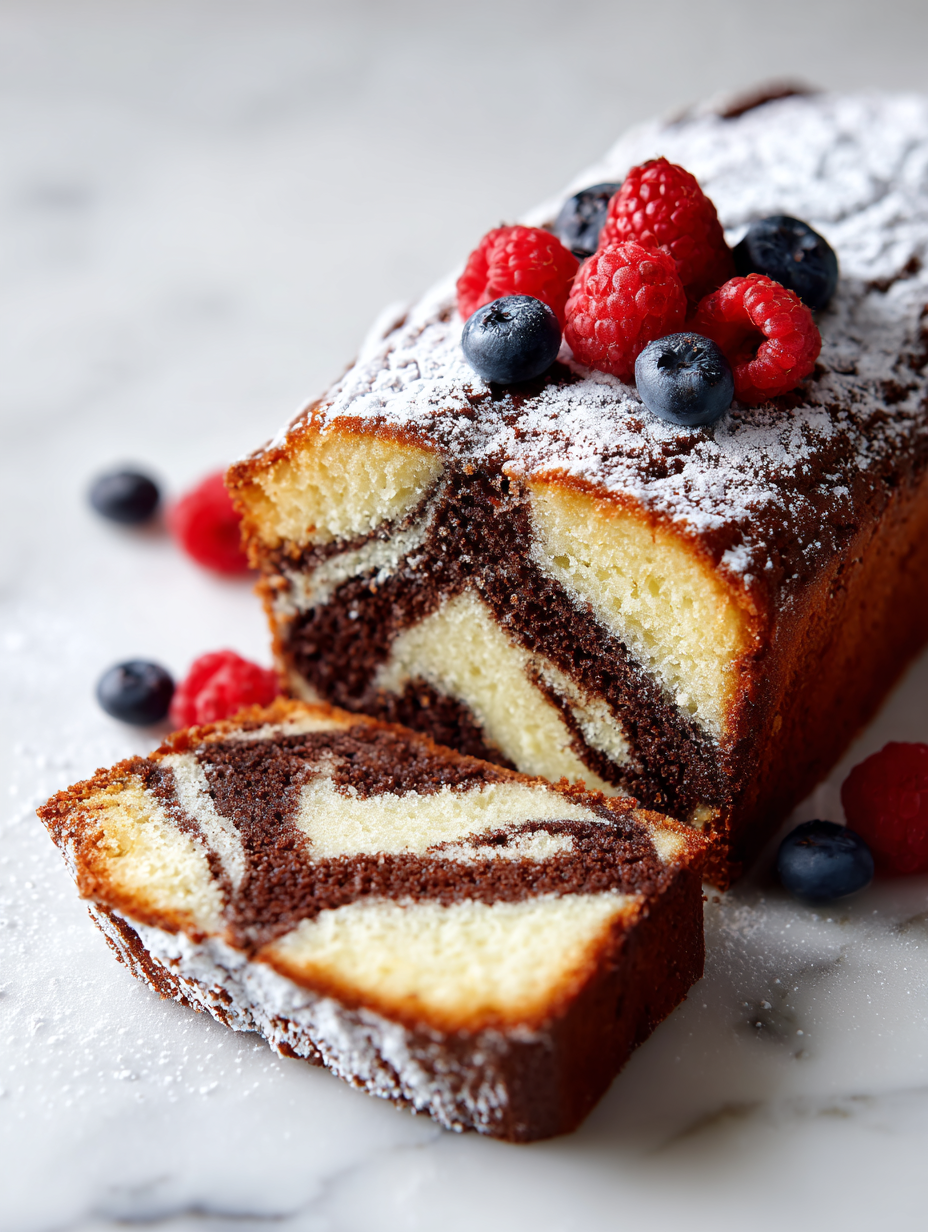
There’s something satisfying about seeing that marbled swirl unfold in a cake. It’s like a secret handshake between the batter and the baker, a little bit chaotic but ultimately controlled. I’ve always loved how a simple swirl can turn an ordinary pound cake into a visual treat, almost too pretty to cut.
This recipe isn’t just about the look though—it’s about the texture contrast. The dense, buttery crumb paired with the smooth, chocolatey streaks offers a bite that’s both comforting and surprising. It’s a way to elevate a humble loaf into something you want to share, even if just with yourself over a quiet afternoon.
Focusing on the visual and textural contrast of the marble effect, I see it as a way to make baking feel more artistic and less intimidating. It’s about creating a cake that’s as much a feast for the eyes as for the palate, turning an everyday loaf into a statement piece.
The artistry of marbling in baking
- Watching the swirl of chocolate and vanilla come together feels like witnessing a quiet magic trick.
- Baking this cake reminds me of my grandma’s kitchen, where simple ingredients felt like treasures.
- There’s a strange pride in creating something so beautiful with just a spoon and a couple of bowls.
- The first slice reveals that perfect marbled pattern, a small thrill each time I see it.
- Sharing this cake always feels special—people can’t resist the visual and the rich, buttery flavor.
The inspiration behind this cake
- Making this marble pound cake always takes me back to lazy Sunday mornings in my childhood, when my mother would pull out her old mixing bowls and let me swirl the chocolate into the vanilla. That simple act of marbling felt like a quiet rebellion, a way to make something ordinary look so much more special. It’s funny how a few spoonfuls of cocoa can turn a straightforward pound cake into a little piece of art, and somehow, it’s always been my favorite part of baking.
- This recipe came together over years of trying to mimic those childhood memories, but also making it my own—less sugar, more butter, a touch of vanilla that’s just enough to warm the whole loaf. It’s not fancy, but it’s honest, and the swirl always feels like a small victory—like I’ve managed to create something that’s both simple and a little bit daring.
- heading
- story_type
Historical and Cultural Tidbits
- The marble effect in cakes dates back to 19th-century European baking, where bakers experimented with swirling techniques to impress guests.
- Originally, marble pound cakes were a way to showcase a baker’s skill in creating contrasting flavors and visual effects without complicated decoration.
- The classic chocolate-vanilla swirl became popular in American kitchens during the early 20th century, symbolizing elegance and simplicity.
- Many traditional recipes used natural cocoa powders, making the marbling process a subtle way to add depth and richness to the cake.
Ingredient breakdown: key components
- Butter: I use unsalted, real butter for that rich, creamy flavor that melts in your mouth, but you can swap in browned butter if you want a nuttier edge.
- Sugar: Granulated sugar keeps the crumb tender and sweet, though honey or maple syrup can add a subtle depth if you reduce the liquid slightly.
- Flour: All-purpose flour is my go-to, but if you want a lighter texture, try cake flour—just remember to adjust the amount to prevent a denser crumb.
- Cocoa powder: I prefer natural unsweetened cocoa for that vibrant, slightly bitter punch, but Dutch-processed will give a smoother, mellow chocolate flavor.
- Eggs: Fresh large eggs give structure and moisture, but if you’re out, egg replacers or aquafaba can work in a pinch, though the texture might be slightly different.
- Vanilla extract: Pure vanilla adds warmth and depth, but a splash of almond or hazelnut extract can give a lovely aroma and twist.
- Chocolate: I like using good-quality dark chocolate chunks or chips for that oozing, bittersweet surprise—feel free to add white chocolate for a sweeter look.
Spotlight on Key Ingredients
Butter:
- I prefer unsalted, real butter for its rich flavor and creamy texture. It melts into the batter, creating a tender crumb that’s subtly savory.
- Swap in browned butter for a nuttier, more complex aroma that deepens the cake’s flavor profile. It’s a small tweak that makes a big difference.
Cocoa Powder:
- Natural cocoa gives a vibrant, slightly bitter punch that balances the sweetness perfectly. It’s like a burst of deep chocolate in every bite.
- Dutch-processed cocoa offers a smoother, more mellow chocolate flavor. It creates a refined, velvety swirl that’s less tangy and more cocoa-rich.
Notes for ingredient swaps
- Dairy-Free: Swap butter for coconut oil or vegan margarine. It may alter the richness and slightly change the crumb texture.
- Sugar: Use honey, maple syrup, or agave nectar instead of granulated sugar. Reduce the liquid in the recipe slightly to compensate.
- Flour: Replace all-purpose flour with almond or oat flour for a nuttier or gluten-free version. Expect a denser crumb and slightly different marbling.
- Cocoa Powder: Use Dutch-processed cocoa for a smoother, mellow chocolate flavor, or natural cocoa for a more vibrant, bitter punch.
- Eggs: Substitute with flax eggs or applesauce if needed. The cake might be slightly less tender but still moist and flavorful.
- Milk: Swap whole milk for almond, soy, or oat milk. Flavors will vary, and the batter may be a tad thinner or thicker.
- Chocolate: Use white chocolate or milk chocolate chips if you prefer a different sweetness level or visual contrast.
Equipment & Tools
- 9×5-inch loaf pan: Holds the batter during baking and defines the shape of the cake.
- Mixing bowls: Separate and combine ingredients smoothly.
- Electric mixer or whisk: Cream butter and sugar, and beat eggs efficiently.
- Spatula: Fold ingredients and swirl batters gently.
- Toothpick or skewer: Test for doneness and create marbled swirl.
- Cooling rack: Allow the cake to cool evenly and prevent sogginess.
Step-by-step guide to marble pound cake
- Preheat your oven to 175°C (350°F). Grease and flour a 9×5-inch loaf pan, or line it with parchment paper for easy release.
- In a large bowl, cream together 1 cup (225g) of softened butter and 1 1/2 cups (300g) of sugar until pale and fluffy, about 3-4 minutes. Use a hand or stand mixer on medium speed.
- Add 3 large eggs, one at a time, beating well after each addition. Make sure each egg is fully incorporated before adding the next. Scrape down the sides of the bowl as needed.
- In a separate bowl, whisk together 2 1/2 cups (310g) of all-purpose flour, 1 teaspoon of baking powder, and a pinch of salt. Gradually add this to the butter mixture, alternating with 1/2 cup (120ml) of whole milk, starting and ending with the dry ingredients. Mix until just combined.
- Divide the batter evenly into two bowls. To one, fold in 1/4 cup (25g) of unsweetened cocoa powder until fully incorporated, creating a chocolate batter.
- Spoon the vanilla batter into the prepared pan, then dollop the chocolate batter on top in random spoonfuls. Using a skewer or knife, gently swirl the two batters together to create a marbled effect, avoiding overmixing.
- Bake in the preheated oven for 55-60 minutes. Check for doneness by inserting a toothpick into the center—if it comes out clean, the cake is ready. If the top starts to darken too quickly, tent with foil.
- Remove the cake from the oven and let it cool in the pan for 15 minutes. Then, transfer to a wire rack to cool completely for at least 1 hour before slicing.
- For clean slices, use a sharp serrated knife. Slice gently to preserve the marbled pattern and avoid squishing the layers. Serve at room temperature with a dusting of powdered sugar or a smear of butter, if desired.
Let the cake cool completely on a wire rack before slicing. Resting allows the crumb to set, making clean cuts easier. Slice with a serrated knife, then serve as is or with a light dusting of powdered sugar.
How to Know It’s Done
- Cake is golden brown and springs back lightly when pressed.
- Toothpick inserted into the center comes out clean or with a few moist crumbs.
- Cake feels firm yet tender, with a slight jiggle in the middle if gently shaken.
Marbled Pound Cake
Ingredients
Equipment
Method
- Preheat your oven to 175°C (350°F). Grease your loaf pan and set aside.
- In a large bowl, beat the softened butter and sugar together with an electric mixer until the mixture is light, fluffy, and turns a pale yellow—about 3-4 minutes. You should hear a gentle whirring and see the mixture increase in volume.
- Add the eggs one at a time, beating well after each addition. The mixture should become smoother and slightly thicker, with a glossy appearance.
- In a separate bowl, whisk together the flour, baking powder, and a pinch of salt. Gradually add the dry ingredients to the wet mixture, alternating with the milk, starting and ending with the flour. Mix until just combined, taking care not to overmix.
- Divide the batter evenly into two bowls. To one, gently fold in the cocoa powder until fully incorporated, creating a rich chocolate batter.
- Spoon the vanilla batter into the prepared loaf pan, then add dollops of the chocolate batter on top in a random pattern. Using a toothpick or skewer, gently swirl through the batters in a figure-eight motion, creating a marbled effect without overmixing.
- Bake the cake for 55-60 minutes, until the top is golden and a toothpick inserted into the center comes out clean. If the top browns too quickly, loosely tent with foil halfway through baking.
- Remove the cake from the oven and let it cool in the pan for about 15 minutes. Then, transfer it to a wire rack and cool completely for at least 1 hour to set the pattern.
- Once cooled, slice the cake with a serrated knife to reveal the beautiful marbled pattern. Serve at room temperature, perhaps with a dusting of powdered sugar or a dollop of whipped cream.
Notes
Pro Tips for Marble Effect
- contrast: Use a toothpick or skewer to gently swirl the batters together—avoid overmixing for a more marbled effect.
- Color check: When the batter starts to look marbled but still streaky, it’s perfect—don’t overdo it, or the swirl will blur.
- Even layers: Drop spoonfuls of each batter alternately—this helps create a distinct, striking marble pattern.
- Temperature tweak: Slightly cooler oven temps (around 170°C/340°F) can prevent the edges from over-baking while the center finishes.
- Swirl finesse: Use a gentle, figure-eight motion with your skewer to create natural, flowing marble lines—no harsh zigzags.
- Batter consistency: Make sure both batters are similar in thickness—if one’s too runny or thick, the swirl won’t hold well.
- Rest before slicing: Let the cake cool completely, at least an hour, to keep the marbled pattern sharp and clean when cut.
Common marble cake mistakes and how to fix them
- FORGOT to preheat the oven → Always preheat to ensure even baking and proper rise.
- DUMPED batter into pan without swirl → Gently swirl with a skewer for distinct marble patterns.
- OVER-TORCHED edges → Cover with foil halfway through baking to prevent darkening.
- MISSED cooling time → Cool completely before slicing to prevent crumbling and preserve pattern.
Quick fixes and pantry swaps
- When batter is too thick, splash in a little milk to loosen it up.
- If swirl disappears during baking, patch with a skewer and swirl again before baking.
- Splash a few drops of water on the oven floor if the cake cracks or dries out.
- Dumped batter too mixed? Open oven, gently swirl with a skewer for more marbling.
- When cake edges darken quickly, shield with foil to prevent over-torching.
Prep, store, and reheat tips
- Prepare the batter in advance and store it covered in the fridge for up to 24 hours; the flavors meld beautifully overnight, and the swirl remains distinct.
- Wrap the cooled cake tightly with plastic wrap or store in an airtight container; it stays moist and fresh for up to 3 days at room temperature, especially in cooler weather.
- For longer storage, freeze slices or the whole cake for up to 2 months; wrap tightly to prevent freezer burn and preserve the marbled appearance.
- Reheat slices briefly in the microwave at medium power (about 20 seconds) until just warm; the butter and chocolate will be soft, and the aroma inviting. For a quick refresh, warm the slice until it shimmers slightly and smells rich.
Top questions about marble pound cake
1. Should I use cold or room temperature ingredients?
Use room temperature eggs and butter for smooth, even mixing and better marbling effects.
2. Can I add other mix-ins to the batter?
Yes, you can swirl in nuts, berries, or caramel for extra texture and flavor contrast.
3. How do I avoid overmixing the batters?
Overmixing can cause a dense cake; fold gently and stop just as the marbled pattern appears distinct.
4. Why doesn’t my marbling show after baking?
If the swirl isn’t visible after baking, try a slightly thicker batter or more vigorous swirl before baking.
5. How long should I bake the cake?
Bake at 175°C (350°F) for about 55-60 minutes, but start checking at 50 minutes for doneness.
6. What cocoa should I use for the best swirl?
Use high-quality cocoa for a rich, vibrant chocolate flavor and a deep marbled contrast.
7. Should I cool the cake before slicing?
Allow the cake to cool fully on a wire rack before slicing for clean, sharp marbled lines.
8. What tools are best for swirling and testing?
A skewer or toothpick is perfect for creating the swirl pattern and testing doneness in the center.
9. How should I store leftover marble pound cake?
Store the cake wrapped tightly at room temperature for up to 3 days or freeze for longer storage.
10. How do I reheat slices without drying them out?
Reheat slices briefly in the microwave for 10-15 seconds until warm and fragrant, but don’t overdo it.
This marble pound cake isn’t just about looks; it’s about the joy of creating something that feels both nostalgic and a little daring. The contrast of textures and flavors makes each slice a small celebration, especially when served with a cup of coffee or tea on a lazy afternoon.
In these times, baking something visually striking and comforting feels like a quiet act of rebellion. It’s a reminder that the simplest ingredients, when combined with care, can turn into a moment of beauty and satisfaction that lingers long after the last crumb.

Hi, I’m Benjamin Reynolds, the creator behind Strategically Seasoning. I started this blog because I believe great cooking is not random. It is thoughtful. It is intentional. It is built step by step with purpose. Seasoning is not something you sprinkle at the end and hope for the best. It is a strategy.

