There’s something quietly satisfying about rolling out sugar cookie dough and shaping each one by hand. It’s almost meditative, the way the dough feels under your fingertips—soft but firm, cool yet pliable. Decorating them brings out a playful side, turning simple cookies into tiny edible canvases, imperfect but full of personality.
I’ve always loved how these cookies can be a slow, mindful activity on a lazy afternoon or a chaotic project with kids. Every batch turns out a little different, and that’s part of the charm. No perfect symmetry needed—just your hands, some icing, and a whole lot of sweet, buttery smell filling the kitchen.
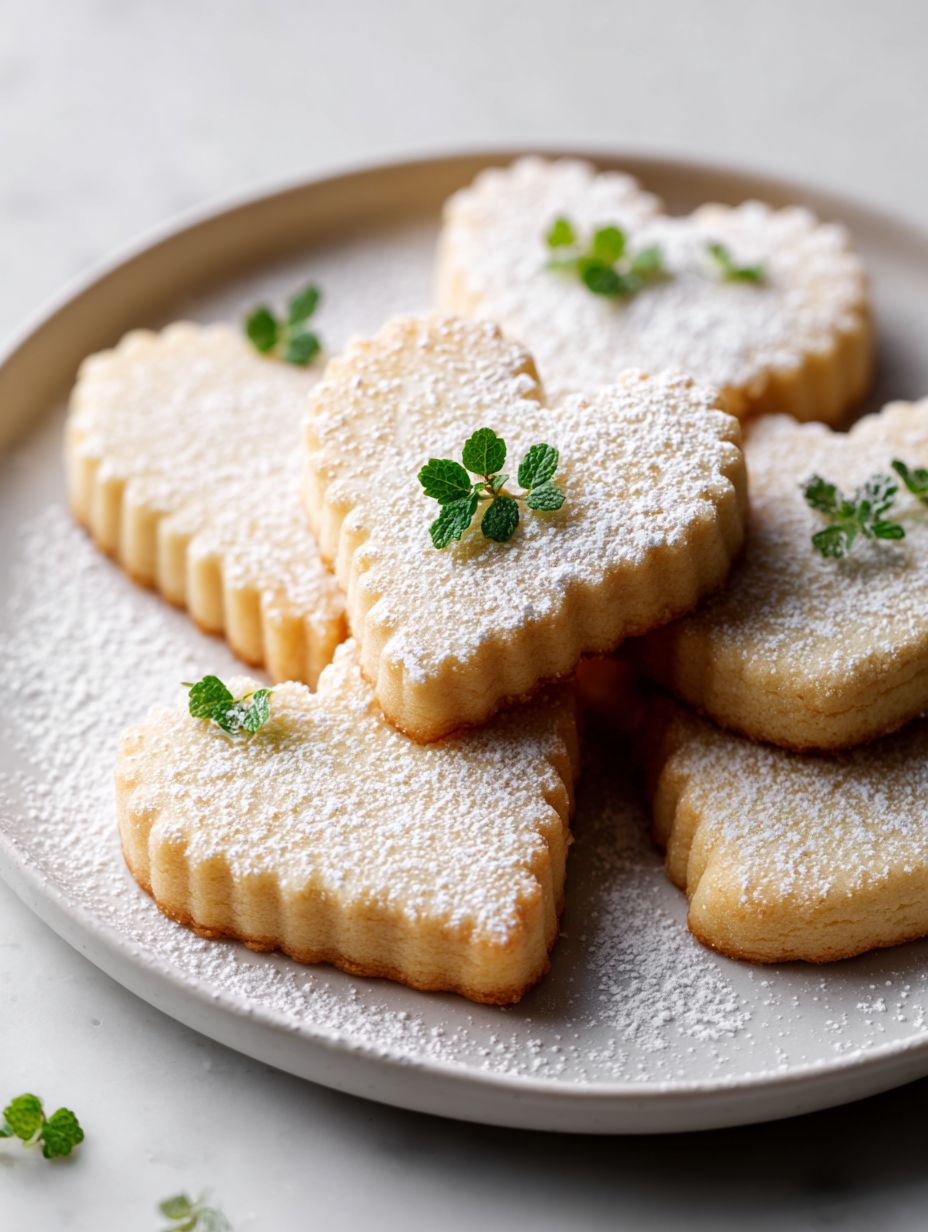
Focusing on the tactile joy of shaping and decorating sugar cookies by hand, emphasizing the meditative process and imperfect beauty that makes each batch uniquely charming.
The story behind this recipe
- This recipe harks back to childhood afternoons in my grandma’s kitchen, where the smell of vanilla and butter filled the air, and I’d carefully cut out dough shapes with her old cookie cutters. Those moments of kneading and shaping felt like quiet acts of love, simple yet full of meaning. It’s funny how something so small can carry so much nostalgia.
- Over the years, I’ve tweaked her basic recipe—less sugar, a touch of lemon zest, and a slower chill in the fridge—to make the cookies more forgiving and easier to handle. Baking these always feels like a small act of honoring tradition, but with a little personal twist. It’s a way to slow down, get a little messy, and still keep that warm, sweet magic alive.
- heading
Ingredient breakdown: key components
- Unsalted butter: I prefer using softened butter for that melt-in-your-mouth texture. If yours is cold, give it a minute at room temp, then cream it well for a smooth dough.
- Granulated sugar: It’s the sweetness that defines these cookies; I like a little extra for that subtle crunch and caramel notes. Cut back if you want a less sweet treat.
- Eggs: They bind everything together and add richness. For a fluffier crumb, use a slightly larger egg or add an extra teaspoon of milk if the dough feels stiff.
- Vanilla extract: That burst of aroma makes all the difference. I always splash in a generous teaspoon—don’t skimp, it’s the soul of the flavor.
- All-purpose flour: I sift mine to avoid lumps and ensure a tender crumb. If your dough feels sticky, sprinkle in a little more flour, but don’t overdo it or cookies get tough.
- Baking powder: Just a pinch helps the cookies rise slightly, giving them a soft, tender edge. If you prefer denser cookies, skip it altogether.
- Salt: A small pinch enhances sweetness and balances flavors. I like to sprinkle a tiny bit into the flour for even distribution, especially if you’re using salted butter.
Spotlight on key ingredients
Unsalted butter:
- I prefer using softened butter for that melt-in-your-mouth texture. If yours is cold, give it a minute at room temp, then cream it well for a smooth dough.
- Granulated sugar: It’s the sweetness that defines these cookies; I like a little extra for that subtle crunch and caramel notes. Cut back if you want a less sweet treat.
- Vanilla extract: That burst of aroma makes all the difference. I always splash in a generous teaspoon—don’t skimp, it’s the soul of the flavor.
All-purpose flour:
- I sift mine to avoid lumps and ensure a tender crumb. If your dough feels sticky, sprinkle in a little more flour, but don’t overdo it or cookies get tough.
- Eggs: They bind everything together and add richness. For a fluffier crumb, use a slightly larger egg or add an extra teaspoon of milk if the dough feels stiff.
- Baking powder: Just a pinch helps the cookies rise slightly, giving them a soft, tender edge. If you prefer denser cookies, skip it altogether.
Notes for ingredient swaps
- Dairy-Free: Swap butter for coconut oil or margarine. Expect a slightly different richness and a hint of coconut aroma.
- Sugar Alternatives: Use honey, maple syrup, or coconut sugar. Each will add a unique flavor; honey makes cookies slightly chewier.
- Egg-Free: Substitute with unsweetened applesauce or flaxseed meal mixed with water. Cookies may be a bit less tender but still delightful.
- Gluten-Free: Replace all-purpose flour with a blend of almond flour and gluten-free baking mix. Expect a denser, nuttier cookie.
- Flavor Boost: Add a pinch of lemon zest or almond extract to brighten or deepen the flavor profile.
- Color Variations: Use brown sugar instead of white for richer, caramel notes and darker cookies.
- Texture Tweaks: Incorporate a handful of oats or chopped nuts for crunch and additional flavor complexity.
Equipment & Tools
- Rolling pin: To evenly flatten dough to desired thickness.
- Cookie cutters: To cut dough into shapes.
- Baking sheet: To hold cookies during baking.
- Parchment paper: To prevent cookies from sticking and promote even baking.
- Wire rack: To cool cookies evenly after baking.
Step-by-step guide to baking
- Gather your equipment: a rolling pin, cookie cutters, a baking sheet, and parchment paper. Preheat your oven to 180°C (350°F).
- Cream softened butter and sugar in a large bowl for about 3-4 minutes until light and fluffy, with a slightly sweet aroma.
- Beat in the egg and vanilla extract until well combined; the mixture should look smooth and shiny.
- In a separate bowl, whisk together flour, baking powder, and salt. Gradually add dry ingredients to wet, mixing just until combined. The dough should hold together but not be sticky.
- Divide dough into two parts, flatten into disks, wrap in plastic wrap, and chill in the fridge for at least 30 minutes. This makes rolling easier and prevents spreading.
- Lightly flour your work surface and rolling pin. Roll one dough disk to about 0.5 cm (1/4 inch) thickness. Keep the dough cold and work quickly to prevent melting.
- Use cookie cutters to shape your cookies. Transfer them carefully to your prepared baking sheet, spacing about 2 inches apart.
- Bake in the middle rack for 8-10 minutes. The edges should just begin to turn golden and smell faintly caramelized.
- Remove from oven and let cookies sit on the baking sheet for 2 minutes before transferring to a wire rack to cool completely. They firm up as they cool.
- Once cooled, decorate as desired with icing, sprinkles, or leave plain for a buttery, crisp bite.
Let the cookies cool completely on a wire rack before decorating or storing. Store in an airtight container at room temperature for up to a week, or freeze for longer storage. For best flavor, bring to room temp before serving.
How to Know It’s Done
- Cookie edges are lightly golden and firm to the touch.
- Cookies feel sturdy but not hard when you lift them gently.
- The aroma of vanilla and baked butter fills your kitchen, inviting you in.
Classic Hand-Shaped Sugar Cookies
Ingredients
Equipment
Method
- In a large mixing bowl, beat softened butter and sugar together with a hand or stand mixer until the mixture is light, fluffy, and fragrant—about 3-4 minutes. You should see the color lighten and hear a gentle whirring sound.
- Add the egg and vanilla extract, then beat until the mixture is smooth and shiny, about 1 minute. The dough will start to look cohesive and glossy.
- In a separate bowl, whisk together the sifted flour, baking powder, and salt. Gradually add the dry ingredients to the wet mixture, mixing on low speed just until combined—be careful not to overmix, as this keeps the cookies tender.
- Divide the dough into two equal parts, shape each into a flat disk, wrap tightly in plastic wrap, and refrigerate for at least 30 minutes. This helps the dough relax and makes rolling easier.
- Preheat your oven to 180°C (350°F). Lightly flour a clean work surface and your rolling pin. Take one chilled dough disk out of the fridge and roll it out to about 0.5 cm (1/4 inch) thickness, turning occasionally to maintain an even layer.
- Use cookie cutters to cut out shapes from the dough, pressing firmly but carefully to keep the shapes crisp. Transfer the cut cookies to a parchment-lined baking sheet, spacing them about 2 inches apart.
- Bake in the preheated oven for 8-10 minutes, or until the edges are just beginning to turn a light golden brown and smell sweet and buttery. Keep an eye on them to prevent overbaking.
- Remove the cookies from the oven and let them sit on the baking sheet for about 2 minutes. Then, transfer them carefully to a wire rack to cool completely—their aroma will fill your kitchen as they cool and firm up.
- Once cooled, decorate the cookies with icing, sprinkles, or leave them plain to enjoy the buttery flavor. Store in an airtight container at room temperature for up to a week, or freeze for longer storage.
Tips for perfect sugar cookies
- Bolded mini-head: Chill the dough thoroughly → Keeps cookies from spreading too much during baking.
- Bolded mini-head: Use parchment paper → Prevents sticking and ensures even browning on the edges.
- Bolded mini-head: Keep dough cold while rolling → Prevents sticking and maintains shape.
- Bolded mini-head: Watch the edges → Remove cookies just as they turn golden for perfect texture.
- Bolded mini-head: Decorate cooled cookies → Icing sets better and looks smoother once cookies are at room temperature.
- Bolded mini-head: Don’t overwork the dough → Overmixing makes cookies tough; mix just until combined.
- Bolded mini-head: Use a gentle touch with cutters → Press down firmly but avoid twisting to keep shapes sharp.
Common mistakes and how to fix them
- FORGOT to chill dough → Chill dough for easier handling and better shape retention.
- DUMPED too much flour → Use just enough to prevent sticking, or cookies become tough.
- OVER-TORCHED edges → Bake until lightly golden, not dark or burnt.
- MISSED resting time → Rest dough for at least 30 minutes for better texture and flavor.
Quick Fixes and Pantry Swaps
- When dough feels sticky → Splash more flour on surface and hands before rolling.
- If cookies spread too much → Chill dough longer or decrease oven temperature slightly.
- Dumped too much sugar → Patch with a tiny bit of flour and re-knead gently.
- Over-torched edges → Shield with foil halfway through baking or reduce oven heat.
- When in doubt, rescue with a quick 5-second reheat in low oven—cookies shimmer and crisp up.
Prep, store, and reheat tips
- Prepare dough in advance, wrap tightly, and chill for up to 24 hours to develop flavor and firm up for easier rolling.
- Cookies can be baked, cooled, and stored in an airtight container at room temperature for up to a week; they’ll stay fresh and crisp.
- For longer storage, freeze unbaked cookie shapes wrapped in plastic, then bake directly from frozen, adding an extra 1-2 minutes.
- Decorate cookies once completely cooled; the flavors deepen slightly after a day, and icing sets better for a polished look.
- Reheat decorated cookies briefly in a low oven (about 150°C/300°F) for 5 minutes if they lose crispness—watch for slight shimmer of warmth, not steam.
Top questions about sugar cookies
1. Should I use softened or cold butter?
Use softened, room-temperature butter for easy creaming and a tender cookie. Cold butter makes the dough hard to work with.
2. How long should I chill the dough?
Chill the dough for at least 30 minutes; it firms up, making it easier to roll and shape without spreading too much.
3. How do I know when the cookies are done?
Bake cookies until the edges are just lightly golden and smell sweetly buttery. Overbaking makes them too hard.
4. My dough cracks when rolling, what do I do?
If the dough cracks while rolling, let it warm slightly or re-knead briefly with a touch more flour.
5. When should I decorate the cookies?
Decorate cooled cookies with royal icing or sprinkles. Decorating while warm causes colors to bleed and icing to melt.
6. How should I store sugar cookies?
Store baked cookies in an airtight container at room temperature for up to a week. For longer, freeze in layers separated by parchment.
7. How do I get sharp cookie shapes?
Use a sharp cookie cutter and press firmly but avoid twisting to keep shapes sharp and clean.
8. Why do my cookies spread too much?
To avoid spreading, keep dough cold and don’t overwork it. Excess handling warms the dough and causes spreading.
9. Can I add other flavors to the dough?
For a richer flavor, add a splash of almond extract or lemon zest to the dough before mixing.
10. How can I re-crisp cookies that are soft?
Reheat decorated cookies gently in a 150°C (300°F) oven for about 5 minutes to refresh crispness without melting icing.
Making these sugar cookies by hand is about embracing the imperfect charm of each shape and crack. The smell of vanilla and butter filling the room as you work feels like a quiet celebration of simple pleasures, especially when decorated with care or left plain to savor that buttery bite.
In a world that rushes by, taking the time to shape, bake, and taste these cookies reminds me of slower afternoons and childhood memories. They’re more than just treats—they’re tiny moments of mindfulness, wrapped in sweetness and nostalgia, waiting to be shared or kept for yourself.

Hi, I’m Benjamin Reynolds, the creator behind Strategically Seasoning. I started this blog because I believe great cooking is not random. It is thoughtful. It is intentional. It is built step by step with purpose. Seasoning is not something you sprinkle at the end and hope for the best. It is a strategy.

