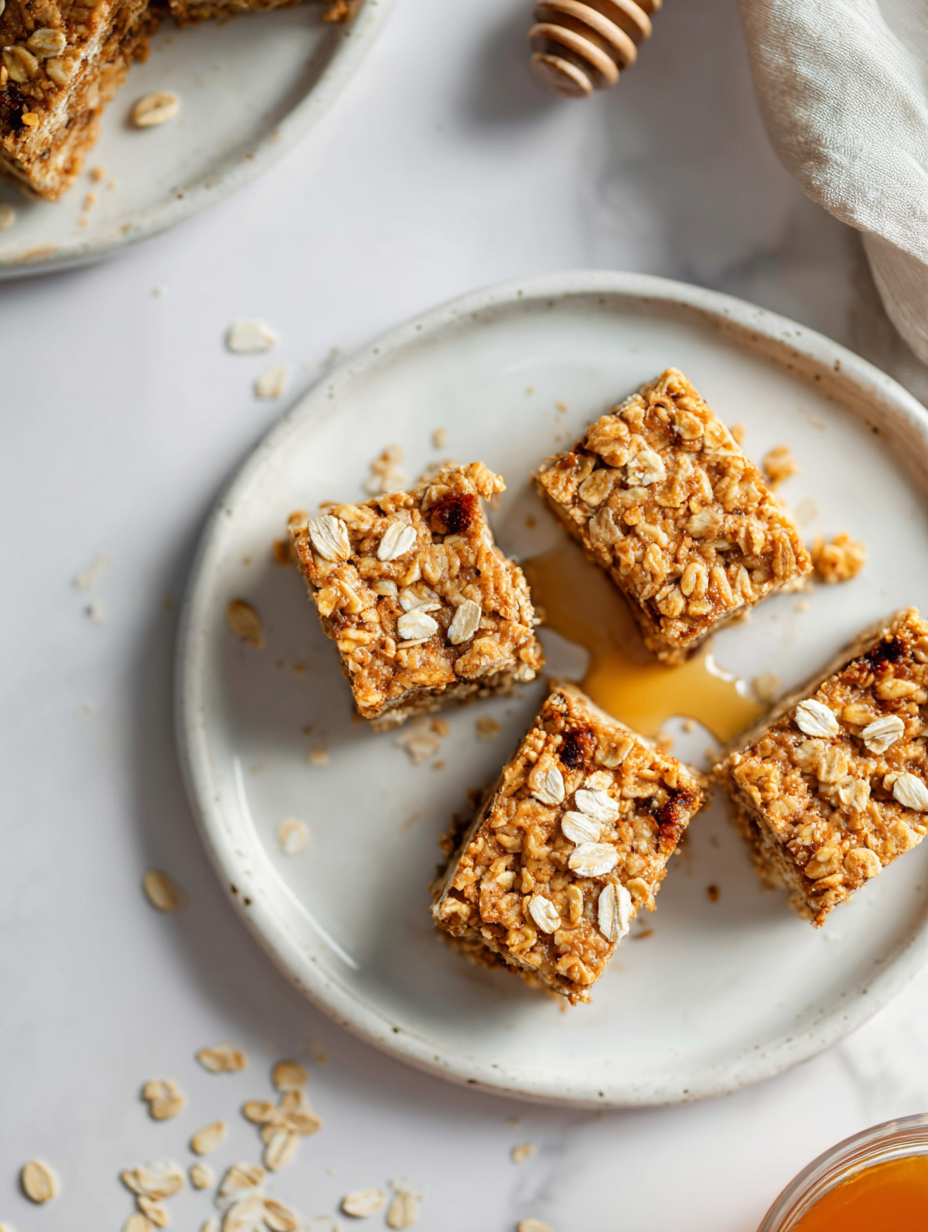
These oatmeal bars are the kind of treat that sneaks up on you—simple, familiar, but with just enough sweetness to make mornings a little brighter. They’re not fancy, but they pack a punch of comfort, perfect for grabbing on your way out the door or enjoying with a cup of coffee while still in pajamas.
What I love most is how versatile they are. Made with honest ingredients like oats, honey, and a touch of butter, they remind me of lazy weekends and childhood mornings. No fuss, no complicated steps—just a reliable, wholesome snack that feels like a small act of kindness in your busy day.
Sometimes, these bars are the only thing standing between me and a chaotic morning. They’re honest, practical, and always there when I need a quick bite that’s satisfying and comforting. It’s that simple, unpretentious sweetness that keeps me coming back.
Focusing on how these oatmeal bars serve as a nostalgic, no-fuss breakfast treat that’s perfect for busy mornings or lazy weekends, blending the comfort of familiar flavors with a practical, grab-and-go approach.
The story behind this recipe
- This recipe came together one rainy afternoon when I needed something quick, warm, and a little nostalgic. I remember my grandmother’s kitchen—her oatmeal cookies and the smell of toasted oats filling the air. I wanted that feeling of comfort, but in a more portable form that I could grab and go.
- I’ve always loved how oatmeal bars feel like a hug—filling, honest, and a little chewy. They’re the kind of thing I make when I want to feel grounded, especially on mornings when everything feels chaotic. It’s surprising how something so simple can carry a little piece of childhood into busy adult life.
- heading: The story behind this recipe
Key Ingredients and Tips
- Old-fashioned rolled oats: I love the chewiness they add, but if you prefer something softer, try quick oats instead—just don’t overdo the liquid, or they’ll turn mushy.
- Honey: It’s what gives these bars their subtle, golden sweetness and sticky texture. Swap with maple syrup for a richer, more caramel note, but reduce the liquid slightly.
- Butter: Adds richness and helps everything hold together. If you want a dairy-free version, coconut oil works but will give a faint coconut aroma and slightly different crispness.
- Brown sugar: I like the touch of molasses in it—deepens the flavor and adds a bit of moisture. You could try coconut sugar for a more caramel vibe, but it’s a bit drier.
- Dried fruit (like raisins or cranberries): I toss these in for bursts of sweetness and chew. You could use chopped nuts instead for crunch, or omit entirely for a plainer bar.
- Vanilla extract: It brightens the overall flavor with a warm, sweet aroma. Skip it if you’re out, but it’s worth having on hand for that cozy depth.
- Salt: Just a pinch balances the sweetness and enhances the oats’ nutty flavor. Don’t skip it; it’s the secret to making everything taste more rounded.
Spotlight on key ingredients
Oats:
- Old-fashioned rolled oats: I love how they stay chewy and slightly nutty after baking; quick oats soften too much and lose texture.
- Honey: It’s what gives these bars their sticky sweetness and golden, oozing edges; maple syrup adds a richer aroma but can alter the crispness.
Sweeteners:
- Butter: It melts into the oats, creating that crisp, buttery crust; coconut oil works as a dairy-free alternative, but adds a faint coconut scent.
- Brown sugar: It deepens the flavor with molasses undertones and keeps the bars moist; coconut sugar offers a caramel note but drier texture.
Notes for ingredient swaps
- Dairy-Free: Coconut oil can replace butter, adding a subtle coconut aroma and slightly different crispness.
- Sweetener: Maple syrup can substitute honey for a richer, caramel-like flavor, but reduce the liquid slightly.
- Oats: Quick oats work in a pinch but will give a softer, less chewy texture compared to rolled oats.
- Sugar: Coconut sugar adds a deep caramel flavor and moisture, but may make the bars slightly drier.
- Add-ins: Chopped nuts can replace dried fruit for crunch, or omit both for a plainer bar.
- Flavor Boost: A splash of lemon juice or zest can brighten the bars, especially if using dried fruit.
- Salt: Fine sea salt enhances overall flavor; regular table salt works too, just use a pinch.
Equipment & Tools
- 8-inch square baking dish: Holds the mixture for baking, ensures even cooking.
- Mixing bowls: Combine dry ingredients and wet mixture separately.
- Saucepan: Melt butter and honey, infuse flavors.
- Spatula: Mix ingredients thoroughly and press mixture into the pan.
- Sharp knife: Cut baked bars cleanly.
Step-by-step guide to oatmeal bars
- Preheat your oven to 180°C (350°F). Grease an 8-inch square baking dish with butter or line with parchment paper for easy removal.
- In a large bowl, mix 1 1/2 cups rolled oats, 1/2 cup brown sugar, and 1/4 teaspoon salt. Set aside.
- In a small saucepan over medium heat, melt 1/2 cup butter with 1/3 cup honey and 1 teaspoon vanilla extract. Stir until smooth and fragrant, about 2-3 minutes.
- Pour the warm butter mixture over the oats mixture. Use a spatula to evenly coat all the dry ingredients, breaking up any clumps. The mixture should be slightly sticky and fragrant.
- Transfer the mixture to the prepared baking dish. Use the back of a spoon or your fingers to press it down firmly and evenly across the pan. This helps the bars hold together.
- Bake in the preheated oven for 20-25 minutes, or until the edges are golden brown and the top is slightly crisp. Your kitchen should smell sweet and toasty.
- Remove from oven and let cool in the pan for 10 minutes. Then, transfer to a wire rack or leave in the dish to cool completely for about 30 minutes. The bars should be firm and set but still chewy.
- Cut into squares or rectangles with a sharp knife. For clean cuts, wipe the knife between slices. Serve slightly warm or at room temperature.
Let the bars cool completely before slicing. Store in an airtight container at room temperature for up to 3 days, or refrigerate for longer freshness. Serve slightly warmed or at room temp for best texture.
How to Know It’s Done
- Edges are golden brown and fragrant when baked.
- The mixture feels firm but slightly chewy when pressed.
- Bars hold their shape when sliced and are not too sticky or crumbly.
Oatmeal Bars
Ingredients
Equipment
Method
- Preheat your oven to 180°C (350°F) and lightly grease your baking dish or line it with parchment paper.
- In a large mixing bowl, combine the rolled oats, brown sugar, and salt. Stir well to distribute evenly.
- In a small saucepan, melt the butter over medium heat, then add honey and vanilla. Stir until the mixture is smooth and fragrant, about 2-3 minutes.
- Pour the warm butter mixture over the dry ingredients in the bowl. Use a spatula to fold everything together until the oats are coated and sticky.
- Transfer the mixture into the prepared baking dish. Use the back of a spatula or your fingers to press it down firmly and evenly across the surface.
- Bake in the preheated oven for 20-25 minutes, until the edges turn a golden brown and the top looks slightly crisp.
- Remove from the oven and let the bars cool in the dish for about 10 minutes, then transfer to a wire rack or leave in the dish to cool completely for 30 minutes.
- Once cooled, use a sharp knife to cut into squares or rectangles. Wipe the knife between cuts for clean edges.
- Serve the oatmeal bars at room temperature or slightly warmed. Enjoy their chewy, golden exterior and comforting flavor.
Pro tips for perfect oatmeal bars
- Boldly press: Use the back of a spatula or your fingers to press the mixture firmly into the pan for even bars.
- Sweet aroma: Melt butter and honey over medium heat until fragrant—about 2-3 minutes—to deepen flavor.
- Color check: Bake until the edges turn a golden brown and smell toasty, about 20-25 minutes.
- Cooling trick: Cool completely in the pan for easier slicing; a full 30 minutes helps the bars set.
- Prevent sticking: Line your baking dish with parchment paper or grease well to avoid crumbles when removing.
- Oats choice: Use old-fashioned rolled oats for chewiness; quick oats will make the bars softer and less chewy.
- Add-in tips: Incorporate dried fruit or nuts before baking for bursts of flavor and texture contrast.
Common mistakes and how to fix them
- FORGOT to measure ingredients accurately → Use a scale for precision, especially for sticky ingredients.
- DUMPED ingredients too quickly → Mix ingredients gently to prevent overworking the oats.
- OVER-TORCHED the bars → Keep an eye on baking time; edges should be golden, not dark.
- SKIPPED the cooling step → Let bars cool completely for clean slices and proper texture.
Quick fixes and pantry swaps
- If the bars are too crumbly, splash a little extra honey or melted butter to help them hold.
- When mixture sticks to your hands, patch with a damp cloth and press firmly again.
- DUMPED in too much oats? Shield with a sprinkle of water and mix to loosen consistency.
- Over-torched edges? Rescue by covering with foil and lowering oven temp for even baking.
- When aroma is faint, quickly increase oven temperature by 10°C (20°F) and watch closely.
Prep, store, and reheat tips
- Prep the dry ingredients—oats, sugar, and salt—ahead of time and store in an airtight container to keep them fresh and ready to mix.
- Baking the bars can be done a day in advance. Cool completely, then wrap tightly in plastic wrap or store in an airtight container to maintain their chewy texture.
- Shelf life is about 3 days at room temperature; for longer storage, refrigerate up to a week, which helps keep them moist and chewy.
- Reheat slices briefly in the microwave—about 10-15 seconds—until warm and fragrant. The aroma of toasted oats and honey should be inviting.
- For best texture, serve slightly warmed or at room temperature. The bars may firm up in the fridge but will soften again with a quick warm-up.
Top questions about oatmeal bars
1. Can I use quick oats instead of rolled oats?
Choose rolled oats for chewiness; quick oats will make them softer and less textured.
2. Can I substitute honey with maple syrup?
Yes, honey gives a sticky, golden sweetness; maple syrup adds a richer, caramel flavor but may alter texture slightly.
3. What’s a good dairy-free fat alternative?
Coconut oil works as a dairy-free fat but will add a faint coconut aroma and a different crispness.
4. Can I add other mix-ins like nuts or dried fruit?
Use chopped nuts for crunch, dried fruit for bursts of sweetness, or leave them out for plainer bars.
5. How do I know when the bars are baked enough?
Bake until the edges are golden brown and fragrant, about 20-25 minutes. They should feel firm but chewy.
6. Should I cool the bars before cutting?
Let the bars cool completely in the pan for about 30 minutes to set before slicing.
7. How should I store leftover oatmeal bars?
Store in an airtight container at room temperature for 3 days or refrigerate for up to a week.
8. Can I warm up the bars before eating?
Reheat slices in the microwave for about 10-15 seconds until warm and fragrant.
9. My bars are crumbly; how do I fix that?
If the mixture is too crumbly, add a splash of honey or melted butter to help it hold together.
10. How can I make the bars crunchier?
For a crispier crust, bake a minute longer or press the mixture more firmly into the pan before baking.
These oatmeal bars are more than just a snack; they carry a quiet nostalgia that’s hard to shake. Making them reminds me of simpler mornings, where the smell of toasted oats and honey filled the air, and everything felt a little more manageable.
They’re a practical comfort—easy to throw together, no fuss, and endlessly adaptable. When I need a quick grab-and-go breakfast or a little reminder of slow weekend mornings, these bars are always ready to deliver.

Hi, I’m Benjamin Reynolds, the creator behind Strategically Seasoning. I started this blog because I believe great cooking is not random. It is thoughtful. It is intentional. It is built step by step with purpose. Seasoning is not something you sprinkle at the end and hope for the best. It is a strategy.

