Lemon bars often get a bad rap for being either too tart or too sweet, but I’ve spent years trying to find that sweet spot where the lemon’s bright, zesty punch is balanced perfectly by a tender, buttery crust. It’s a delicate dance—one that rewards patience and a keen sense of taste, especially when you’re adjusting that tang to your liking. This recipe is about celebrating the citrus’ sharpness without overpowering the gentle sweetness that makes lemon bars so addictive.
I remember the first time I made lemon bars for a summer picnic and how everyone kept asking for seconds, eyes squeezed shut in delight at that perfect tang. It’s not just about the flavor, but the texture—crisp crust giving way to a silky, zingy filling that’s just firm enough to slice but still melts in your mouth. That harmony of textures and flavors is what keeps me coming back to this recipe, tweaking it here and there, always chasing that ideal balance.
Focusing on the forgotten art of balancing sharpness and sweetness in lemon bars, this recipe emphasizes creating a harmonious bite that dances on the tongue, rather than overwhelming with citrus or overly sugary crust.
The story behind this recipe
- I’ve always loved the way lemon bars can brighten up a gloomy afternoon, especially when I stumbled upon an old, stained recipe card in my grandmother’s handwriting. That tangy, sweet aroma fills the kitchen with memories of lazy weekends and family gatherings—simple moments but packed with flavor and laughter.
- Making lemon bars feels like a small act of nostalgia—recreating a piece of my childhood, where the smell of fresh citrus and buttery crust meant comfort. It’s a recipe that’s been passed down, tweaked over the years, but still holds that core of joy I associate with home. Every batch reminds me that good baking is about patience, balance, and a little bit of love.
- heading:
Key ingredients and tips
- Lemon zest: I love using a microplane to get that bright, fragrant zest which adds a punch of citrus aroma. Skip it, and the filling loses that zing.
- Fresh lemon juice: Nothing beats the sharp, clean flavor of freshly squeezed lemon. If you’re in a pinch, bottled juice is okay, but it’s duller and less vibrant.
- Butter: I prefer unsalted, cold butter for the crust—gives it that tender, flaky texture. Warm butter makes the crust greasy and tough, so keep it chilled.
- Sugar: Granulated sugar is my go-to for the filling—it dissolves smoothly and balances the tartness. Use too much, and it overpowers the lemon; too little, and it’s too sharp.
- Eggs: Fresh eggs give the filling the right silky consistency. Older eggs tend to be watery, making the filling less cohesive and a little runny.
- Flour: I use all-purpose flour for the crust and filling to keep things straightforward. For a gluten-free version, almond flour works but changes the texture—richer and a bit denser.
- Powdered sugar: Sprinkling a dusting on top right before serving adds that final touch of sweetness and visual flair. Skip it if you want a more rustic look.
Spotlight on key ingredients
Lemon:
- Lemon zest: I love using a microplane to get that bright, fragrant zest which adds a punch of citrus aroma. Skip it, and the filling loses that zing.
- Fresh lemon juice: Nothing beats the sharp, clean flavor of freshly squeezed lemon. If you’re in a pinch, bottled juice is okay, but it’s duller and less vibrant.
- Butter: I prefer unsalted, cold butter for the crust—gives it that tender, flaky texture. Warm butter makes the crust greasy and tough, so keep it chilled.
Eggs:
- Sugar: Granulated sugar is my go-to for the filling—it dissolves smoothly and balances the tartness. Use too much, and it overpowers the lemon; too little, and it’s too sharp.
- Fresh eggs give the filling the right silky consistency. Older eggs tend to be watery, making the filling less cohesive and a little runny.
Notes for ingredient swaps
- Dairy-Free: Use coconut oil or vegan butter instead of regular butter. The crust will be slightly less flaky but still tender.
- Sugar Alternatives: Swap granulated sugar for honey or agave syrup. Expect a slightly different texture and a richer flavor.
- Gluten-Free: Almond flour or a gluten-free baking mix can replace all-purpose flour. The crust may be denser and nuttier.
- Lemon Juice: Bottled lemon juice is a decent shortcut, but fresh lemon juice offers a brighter, more vibrant tang.
- Lemon Zest: If you don’t have a microplane, finely grate with a sharp knife or skip entirely, but lose some aromatic punch.
- Sweeteners: Replace sugar with maple syrup for a deeper, caramel-like flavor—adjust acidity accordingly.
- Eggs: Flaxseed eggs (1 tbsp ground flaxseed + 3 tbsp water) work in a pinch, but the filling will be less silky.
Equipment & Tools
- 9×13 inch baking dish: For baking the crust and filling.
- Mixing bowl: To combine ingredients for crust and filling.
- Whisk: To whisk eggs, sugar, and lemon juice smoothly.
- Microplane: To zest the lemons, adding bright aroma.
- Spatula: To press crust into the dish and spread filling.
- Parchment paper: For easy removal and clean slicing.
Step-by-step guide to lemon bars
- Equipment & Tools: Gather a 9×13 inch baking dish, a mixing bowl, a whisk, a microplane, a spatula, and parchment paper. The dish is for baking; the bowl and whisk for mixing; the microplane for zest; the spatula for spreading; parchment for easy removal.
- Preheat your oven to 175°C (350°F). Line the baking dish with parchment, leaving an overhang for easy lifting later.
- Make the crust: In a bowl, combine 1 1/2 cups (190g) all-purpose flour, 1/4 cup (50g) granulated sugar, and a pinch of salt. Add 1/2 cup (115g) cold, cubed unsalted butter. Use your fingers or a pastry cutter to mix until it resembles coarse crumbs. Press evenly into the bottom of the prepared dish. Bake for 20-25 minutes until golden at the edges and fragrant.
- Prepare the filling: While crust bakes, zest 2 lemons with the microplane, then juice them until you have about 1/2 cup (120ml). In a bowl, whisk together 4 large eggs, 1 1/2 cups (300g) sugar, lemon zest, and lemon juice. Add 1/4 cup (30g) all-purpose flour and whisk until smooth. Ensure no lumps remain.
- Pour the lemon filling over the hot crust immediately after baking. Return to oven and bake for an additional 20-25 minutes. The filling should be set but still slightly jiggly in the center, and the edges will be lightly golden.
- Check for doneness: The top should be slightly firm, and the filling will have a gentle shimmer. If it jiggles excessively, bake a few more minutes. If the edges brown too quickly, tent with foil. Remove from oven and let cool in the dish for at least 1 hour.
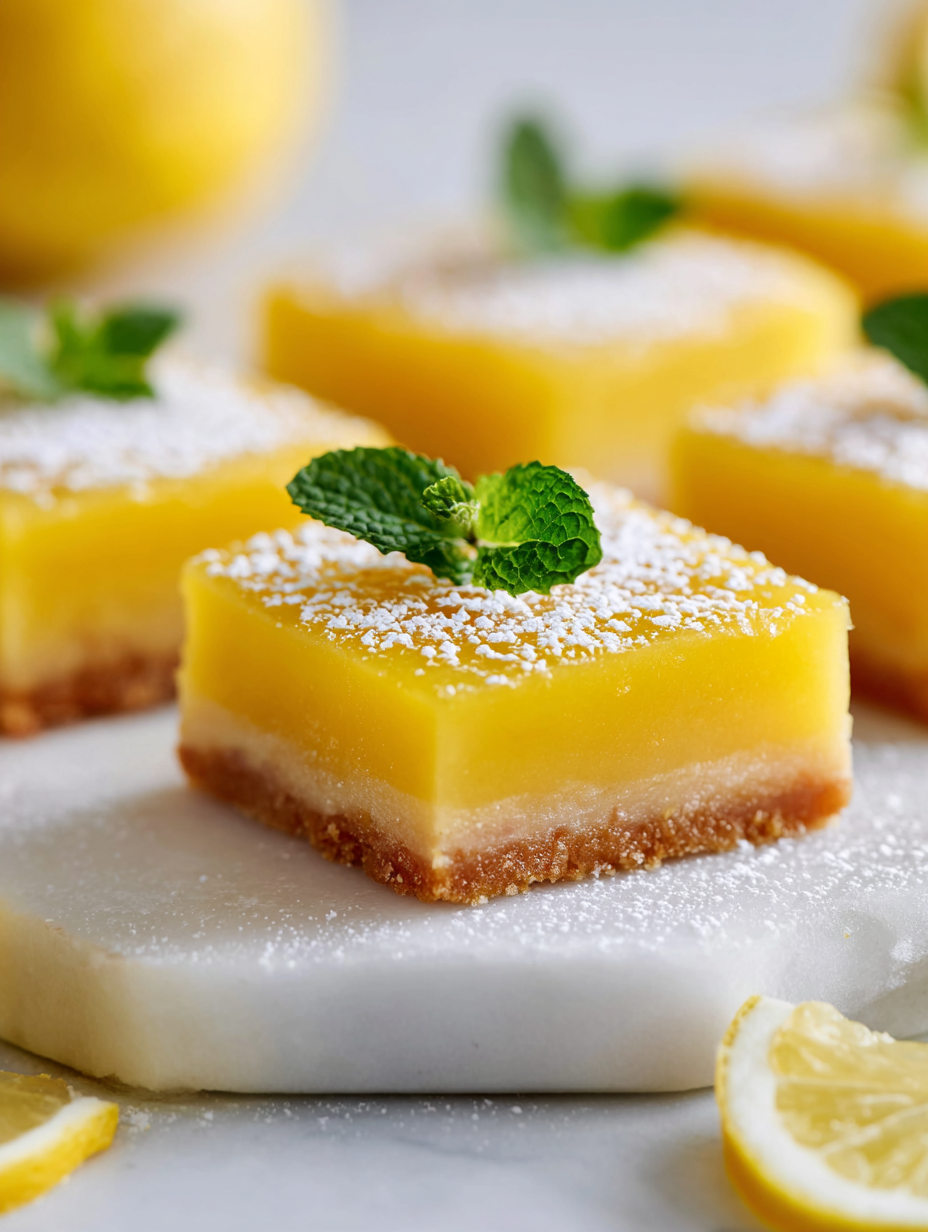
- Rest & finish: Once cooled, transfer the dish to a wire rack. Chill in the refrigerator for at least 2 hours to set fully. Use the parchment overhang to lift the bars out, then cut into squares with a sharp knife. Dust with powdered sugar if desired. Serve chilled or at room temperature.
Let the lemon bars cool in the dish, then chill in the fridge for at least 2 hours. Use the parchment overhang to lift out, cut into squares, and dust with powdered sugar. Serve chilled or at room temp.
How to Know It’s Done
- Crust is golden and fragrant after initial bake.
- Filling is set but slightly jiggly in the center when removed from oven.
- Edges are lightly browned, not burnt or overly dark.
Perfect Lemon Bars
Ingredients
Equipment
Method
- Preheat your oven to 175°C (350°F). Line your baking dish with parchment paper, leaving an overhang for easy removal.
- In a mixing bowl, combine 1 1/2 cups of all-purpose flour, 1/4 cup of granulated sugar, and a pinch of salt. Add the cold, cubed butter and use your fingers or a pastry cutter to work it into the flour until the mixture resembles coarse crumbs.
- Press this crumbly mixture evenly into the bottom of the prepared dish. Bake for 20-25 minutes, until the crust turns golden and fragrant.
- While the crust bakes, zest two lemons using a microplane, then juice them until you have about 1/2 cup of lemon juice. In a separate bowl, whisk together the eggs, 1 1/2 cups of sugar, lemon zest, and lemon juice until smooth and bright.
- Sprinkle the 1/4 cup of flour into the lemon mixture and whisk again until fully combined and silky.
- Pour the lemon filling over the hot crust straight from the oven. Return the dish to the oven and bake for an additional 20-25 minutes, until the filling is set but still slightly jiggly in the center and the edges are lightly browned.
- Remove from the oven and allow to cool completely in the dish. Once cooled, chill in the refrigerator for at least 2 hours to fully set.
- Lift the lemon bars out using the parchment overhang and cut into neat squares with a sharp knife. Dust with powdered sugar if desired and serve chilled or at room temperature.
Pro tips for perfect lemon bars
- Bolded mini-head: Use a microplane to zest lemons; the fine citrus shavings release more aroma and brighten the filling.
- Bolded mini-head: Chill your butter thoroughly; cold butter creates a tender, flaky crust that holds together well during baking.
- Bolded mini-head: Bake the crust until golden; this develops flavor and prevents a soggy base once the filling is added.
- Bolded mini-head: Pour the lemon filling over a hot crust; the contrast helps prevent a soggy bottom and sets the filling faster.
- Bolded mini-head: Slightly jiggle the filling when done; it should be just set with a gentle shimmer, not runny or overcooked.
- Bolded mini-head: Dust with powdered sugar after cooling; adds a subtle sweetness and appealing finish without moisture interference.
- Bolded mini-head: Use a sharp knife to cut clean squares; wipe the blade between cuts for neat, tidy edges.
Common mistakes and how to fix them
- FORGOT to check oven temperature → Use an oven thermometer for accuracy.
- DUMPED the filling too early → Wait until it’s just set and slightly jiggly.
- OVER-TORCHED crust → Cover with foil if edges brown too quickly.
- MISSED mixing lemon zest thoroughly → Incorporate zest well for maximum citrus aroma.
Quick fixes and pantry swaps
- When lemon juice is dull, splash in a bit of vinegar for brightness.
- If filling cracks, quickly press a thin layer of extra lemon mixture on top and smooth.
- When crust is too soft, shield with foil and bake a few minutes longer.
- Splash a little water on the top if powdered sugar clumps during dusting.
- Patch a cracked crust with leftover crumbs mixed with a touch of butter for a quick fix.
Prep, store, and reheat tips
- Prepping the crust can be done a day ahead; keep it wrapped tightly in the fridge to prevent dryness.
- The lemon filling can be made up to 24 hours in advance; store in an airtight container in the fridge, where it remains bright and zingy.
- Store cooled lemon bars in an airtight container at room temperature for up to 2 days, or refrigerate for up to a week, where the flavors meld and intensify.
- Reheat slices gently in the microwave for about 10 seconds; look for a warm, slightly softened texture and a fresh citrus aroma.
- For longer storage, freeze bars wrapped individually in plastic wrap and placed in a sealed container; defrost in the fridge and enjoy the firm, zesty bite.
Top questions about lemon bars
1. Can I use bottled lemon juice?
Use fresh lemon juice for the brightest flavor and the most vibrant, zingy taste. Bottled juice is okay, but it’s duller and less lively.
2. Should I refrigerate the lemon bars before serving?
Chill the lemon bars in the fridge for at least 2 hours to set the filling properly and make slicing easier.
3. How do I know when the lemon bars are done?
Bake until the edges are golden and the filling is just set with a slight jiggle in the center. It shouldn’t be runny or overly firm.
4. What if the crust burns before the filling is set?
If the crust starts to brown too quickly, tent it with foil to prevent burning while the filling finishes baking.
5. Can I skip the powdered sugar topping?
Dust the cooled lemon bars with powdered sugar just before serving for a sweet, attractive finish and extra flavor.
6. Can I make the crust in advance?
You can prepare the crust a day ahead, wrap it tightly, and keep it in the fridge until ready to bake.
7. How long do lemon bars stay fresh?
To store, keep the bars in an airtight container in the fridge for up to a week; they taste best chilled or at room temperature.
8. Can I reheat lemon bars?
Reheat slices briefly in the microwave for about 10 seconds until warm and fragrant, but avoid overheating to keep the texture intact.
9. What if my lemon filling cracks?
If the filling cracks after baking, gently press a small layer of lemon mixture over the cracks and smooth it out for a quick fix.
10. How do I cut clean slices?
Use a sharp knife wiped clean between cuts for neat squares. For extra crisp edges, refrigerate the bars before slicing.
These lemon bars aren’t just a treat—they’re a reminder that simple ingredients, balanced thoughtfully, create something truly memorable. Each bite offers that perfect zing, paired with a buttery, tender crust that holds everything together in a messy, satisfying way.
Making them feels like a small act of rebellion against overly complicated desserts. It’s about appreciating the bright, fresh citrus and the way it can lift your spirit, especially when the days start to hint at spring. No matter the occasion, they always seem to find a way to bring a little extra brightness to the table.

Hi, I’m Benjamin Reynolds, the creator behind Strategically Seasoning. I started this blog because I believe great cooking is not random. It is thoughtful. It is intentional. It is built step by step with purpose. Seasoning is not something you sprinkle at the end and hope for the best. It is a strategy.

