There’s a messy, joyful charm in slicing into a batch of homemade chocolate fudge bars. The way the gooey, rich chocolate melts on your fingers, the sweet scent filling the kitchen — it’s a small, imperfect moment of childhood comfort that sticks with you. This recipe is all about that unpolished, honest joy of treats made with love and a bit of chaos.
I remember pulling a tray from the fridge after a long day, the fudge firm but still slightly sticky, ready to be cut into squares. No fancy ingredients, just simple pantry staples that come together fast. Sometimes, the best memories are made around a messy cutting board, not a polished plate.
Focusing on the nostalgic comfort of childhood treats, this recipe emphasizes a simple, no-fuss approach that brings back messy, joyful memories of slicing into gooey, chocolatey bars with fingers.
The story behind this recipe
Growing up, these fudge bars were my secret stash. My grandma’s kitchen was always filled with the smell of melting chocolate and toasted nuts, and I’d sneak a piece when no one was looking. Making them now, I realize those messy, imperfect moments made the best memories. It’s a recipe that’s traveled through family kitchens and still feels like a warm secret in my own.
Ingredient breakdown: key components
- Butter: I use salted butter for richness, but unsalted works fine if you prefer control over salt levels. The aroma of melting butter is the first thing you’ll notice as it heats up.
- Chocolate: I opt for semi-sweet chocolate chips; they melt into a glossy, fudgy consistency that’s not overly sweet. Feel free to swap for dark chocolate if you want a deeper cocoa punch.
- Sweetened Condensed Milk: I love how it makes the fudge incredibly creamy and sticky, almost like velvet. If you want less sweetness, try reducing the amount slightly or adding a splash of vanilla.
- Vanilla Extract: Just a teaspoon adds a warm, aromatic layer that balances the richness. Skip it if you’re out, but it really enhances the chocolate flavor’s depth.
- Nuts (Optional): I toss in chopped walnuts for crunch, but toasted pecans or even shredded coconut work well. The scent of toasted nuts is a subtle but irresistible hint of what’s to come.
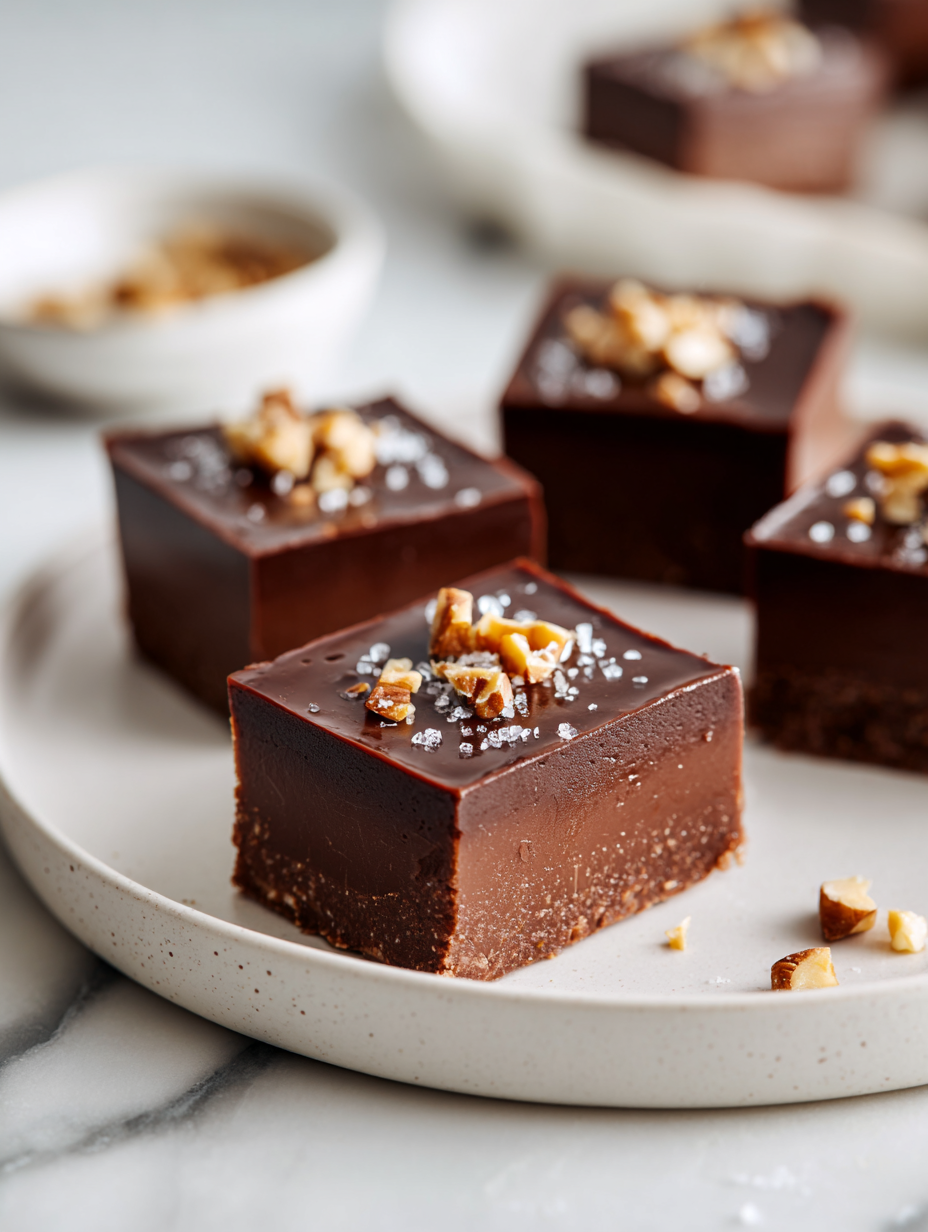
- Salt: A pinch of flaky sea salt on top after baking elevates the chocolate flavor and adds a satisfying crunch. Don’t skip the salt, even if you’re hesitant—it makes all the difference.
- Optional Add-ins: Dried fruit or a sprinkle of sea salt flakes on top before chilling can add a fun contrast. Think of it as a little surprise in each bite.
Spotlight on key ingredients
Chocolate:
- I use semi-sweet chips for that glossy, fudgy melt. They soften into a rich, not-too-sweet bite, but feel free to swap for dark chocolate for a deeper cocoa punch.
- Sweetened Condensed Milk: It makes the fudge velvety and sticky, almost like velvet. If you want less sweetness, try reducing slightly or add a splash of vanilla for warmth.
Butter and Nuts:
- Butter: I prefer salted for that rich aroma, but unsalted works if you want more control over salt. The melting butter releases a faint nutty smell, which signals it’s time to stir.
- Nuts (Optional): Toasted walnuts or pecans add crunch and aroma. They turn fragrant and slightly smoky when toasted, making each bite a surprise of texture and scent.
Notes for ingredient swaps
- Dairy-Free: Swap butter for coconut oil or dairy-free margarine. Expect a slightly different richness and a hint of coconut aroma.
- Vegan Chocolate: Use dark vegan chocolate chips or chopped dark chocolate with a plant-based sweetener. The texture stays fudgy but less creamy.
- Sweetener: Replace condensed milk with coconut condensed milk or sweetened condensed coconut milk for a dairy-free, tropical twist.
- Nuts: Omit or substitute with dried fruit, shredded coconut, or seeds. Nuts add crunch and flavor, but alternatives keep it allergy-friendly.
- Flavor Boost: Add a pinch of espresso powder or chili flakes for a smoky or spicy kick that makes the chocolate pop.
- Salt: Use smoked sea salt or flavored salts like vanilla or lavender. It enhances the chocolate’s depth in unexpected ways.
- Add-ins: Mix in mini marshmallows, crushed cookies, or candy pieces before chilling for extra texture and surprise bites.
Equipment & Tools
- Baking pan: Holds the fudge mixture and shapes it into bars.
- Parchment paper: Prevents sticking and aids in easy removal and slicing.
- Saucepan: Melts butter and chocolate evenly over low heat.
- Spatula: Stirs and spreads the fudge mixture smoothly.
- Knife: Slices the firm fudge into neat bars.
Step-by-step guide to fudge bars
- Gather your equipment: a 20x20cm (8×8 inch) square baking pan, a heatproof spatula, a saucepan, and parchment paper for lining. You want everything within reach to keep the process smooth.
- Line the baking pan with parchment paper, leaving a bit overhang on the sides for easy removal later. This prevents sticking and makes slicing easier.
- In the saucepan, melt 100g (1/2 cup) unsalted butter over low heat. Stir constantly, watching for that shiny, nutty aroma to rise—about 2 minutes.
- Add 200g (about 1 cup) semi-sweet chocolate chips to the melted butter. Stir gently until completely melted and glossy, about 3-4 minutes. If it starts to crackle or smell burnt, lower the heat or remove from burner.
- Stir in 1 can (395g) sweetened condensed milk and 1 teaspoon vanilla extract. Mix until smooth and thickens slightly—about 2 minutes. Keep stirring until no streaks remain.
- Pour the mixture into your prepared pan. Use the spatula to spread it evenly, pushing it into the corners. Tap the pan on the counter to settle the mixture and remove air bubbles.
- Press chopped nuts or mini marshmallows into the top if desired. This adds texture and visual appeal.
- Refrigerate uncovered for at least 2 hours, or until firm. For quicker setting, freeze for about 1 hour, but don’t rush—fudge tastes best when fully set.
- Once firm, lift the fudge out using the parchment overhang. Slice into squares or rectangles with a sharp knife, wiping the blade clean between cuts for neat edges.
- Serve immediately or store in an airtight container. The fudge keeps well in the fridge for up to 2 weeks, or freeze for longer storage.
Chill the fudge until fully set, then lift from the pan using the parchment. Slice carefully, wipe the knife between cuts, and serve directly from the fridge or at room temperature for a softer bite.
How to Know It’s Done
- Fudge is firm and holds shape when pressed gently.
- Edges look glossy and slightly crack when sliced.
- A rich chocolate aroma fills the kitchen during melting.
Homemade Chocolate Fudge Bars
Ingredients
Equipment
Method
- Line your baking pan with parchment paper, leaving some overhang on the sides for easy removal later.
- In a saucepan over low heat, melt the butter gently, stirring constantly until it releases a faint nutty aroma and looks shiny and smooth.
- Add the chocolate chips to the melted butter, stirring slowly until they are completely melted, glossy, and smooth, about 3-4 minutes. Keep the heat low to prevent scorching.
- Stir in the sweetened condensed milk and vanilla extract, mixing until the mixture is thick, glossy, and well combined. Let it bubble gently for about 2 minutes, then remove from heat.
- Pour the fudgy mixture into your prepared pan, spreading it evenly with a spatula. Tap the pan lightly on the counter to remove air bubbles and settle the mixture.
- If desired, sprinkle chopped nuts or mini marshmallows on top, pressing them lightly into the surface to embed them slightly.
- Refrigerate the pan uncovered for at least 2 hours until the fudge is firm and set. For quicker results, freeze for about 1 hour, but allow it to thaw slightly before slicing.
- Once the fudge is firm, lift it out of the pan using the parchment overhang. Use a sharp knife to cut into squares or rectangles, wiping the blade clean between cuts for neat edges.
- Sprinkle a pinch of sea salt on top of each piece if desired, then serve immediately or store in an airtight container in the fridge for up to two weeks.
Notes
Pro tips for perfect fudge bars
- Bolded mini-head: Use low heat → melts chocolate evenly, avoid scorching and dull flavor.
- Bolded mini-head: Chill fudge slowly → prevents cracking; wrap loosely and refrigerate for best texture.
- Bolded mini-head: Tap the pan → releases air bubbles, ensuring a smooth, dense finish.
- Bolded mini-head: Wipe your knife → clean between cuts for sharp, neat edges.
- Bolded mini-head: Add nuts after pouring → press lightly to embed without sinking, for even crunch.
- Bolded mini-head: Smell for nuttiness → toasted butter or nuts release a rich aroma signaling readiness.
- Bolded mini-head: Use parchment overhang → makes lifting and slicing easier, prevents sticking.
Common mistakes and how to fix them
- FORGOT to preheat oven? Chill fudge longer or it won’t set properly.
- DUMPED in too much salt? Rinse and start over with correct amount.
- OVER-TORCHED chocolate? Lower heat immediately and stir until smooth.
- MISSED the cooling step? Fudge becomes crumbly and difficult to slice.
Quick fixes and pantry swaps
- When fudge is too hard, splash a little warm milk and stir until smooth.
- If chocolate seizes, dump in a teaspoon of vegetable oil to smooth it out.
- Overcooked chocolate? Patch with a splash of hot cream, stir until glossy.
- Forgot to line the pan? Shield the edges with foil and gently press fudge back in.
- When texture is crumbly, rescue with a quick microwave melt and remix before chilling again.
Prep, store, and reheat tips
- Prepare the fudge mixture ahead by melting ingredients and pouring into the pan. It firms up faster when chilled, saving time later.
- Store the finished fudge in an airtight container in the fridge for up to 2 weeks, where it keeps its chewy, rich texture and glossy appearance.
- For longer storage, freeze the cut bars wrapped tightly in plastic wrap and foil. They retain flavor and texture for up to 3 months.
- Reheat slices slightly in the microwave for 10-15 seconds until soft and gooey. Watch for melting chocolate and a warm, inviting aroma.
- Allow refrigerated fudge to come to room temperature briefly before serving for a softer, more decadent bite with enhanced flavors.
Top questions about fudge bars
1. Can I substitute the chocolate chips?
Yes, you can use baking chocolate or unsweetened chocolate, but you’ll need to adjust the sugar content accordingly. The texture might be slightly different, more intense in cocoa flavor.
2. Can I use dark chocolate instead?
Absolutely. Using dark chocolate will give a richer, more bittersweet flavor, while milk chocolate makes it milder and creamier.
3. How long can I store the fudge?
Yes, you can refrigerate the fudge for up to two weeks in an airtight container. For longer storage, freezing is ideal—up to three months.
4. How do I reheat the fudge?
Reheat individual pieces in the microwave for about 10 seconds until soft. The aroma of melting chocolate will waft up, signaling they’re ready.
5. My fudge isn’t firm enough, what now?
If your fudge isn’t setting, make sure it cooled slowly in the fridge. If it’s crumbly, re-melt briefly and re-chill to improve texture.
6. Should I add salt on top?
Adding a pinch of sea salt on top after pouring enhances the chocolate flavor and adds a satisfying crunch with each bite.
7. Can I make this dairy-free?
Yes, you can replace butter with coconut oil or vegan margarine. Expect a slightly different aroma and a more coconutty flavor.
8. Can I skip the nuts?
Omit nuts or swap with dried fruit, shredded coconut, or seeds. Nuts add crunch, but alternatives can keep it allergy-friendly or seasonal.
9. How do I get neat edges?
Use a sharp knife, wiping it clean between cuts, to get neat, clean bars. Warming the knife slightly can help slice more smoothly.
10. How do I prevent the chocolate from seizing?
When melting chocolate, keep heat low and stir constantly to prevent burning or seizing, which can make the mixture grainy.
These fudge bars are more than just a sweet treat; they’re a snapshot of messy, joyful moments from childhood. The way the chocolate melts and the aroma fills the room makes every bite feel like a small celebration of simple pleasures.
Sharing them now, I realize that the imperfect edges and gooey centers hold the best memories. They’re a reminder that sometimes, the best recipes are the ones made with love, chaos, and a little bit of fudge-sticky fingers.

Hi, I’m Benjamin Reynolds, the creator behind Strategically Seasoning. I started this blog because I believe great cooking is not random. It is thoughtful. It is intentional. It is built step by step with purpose. Seasoning is not something you sprinkle at the end and hope for the best. It is a strategy.

