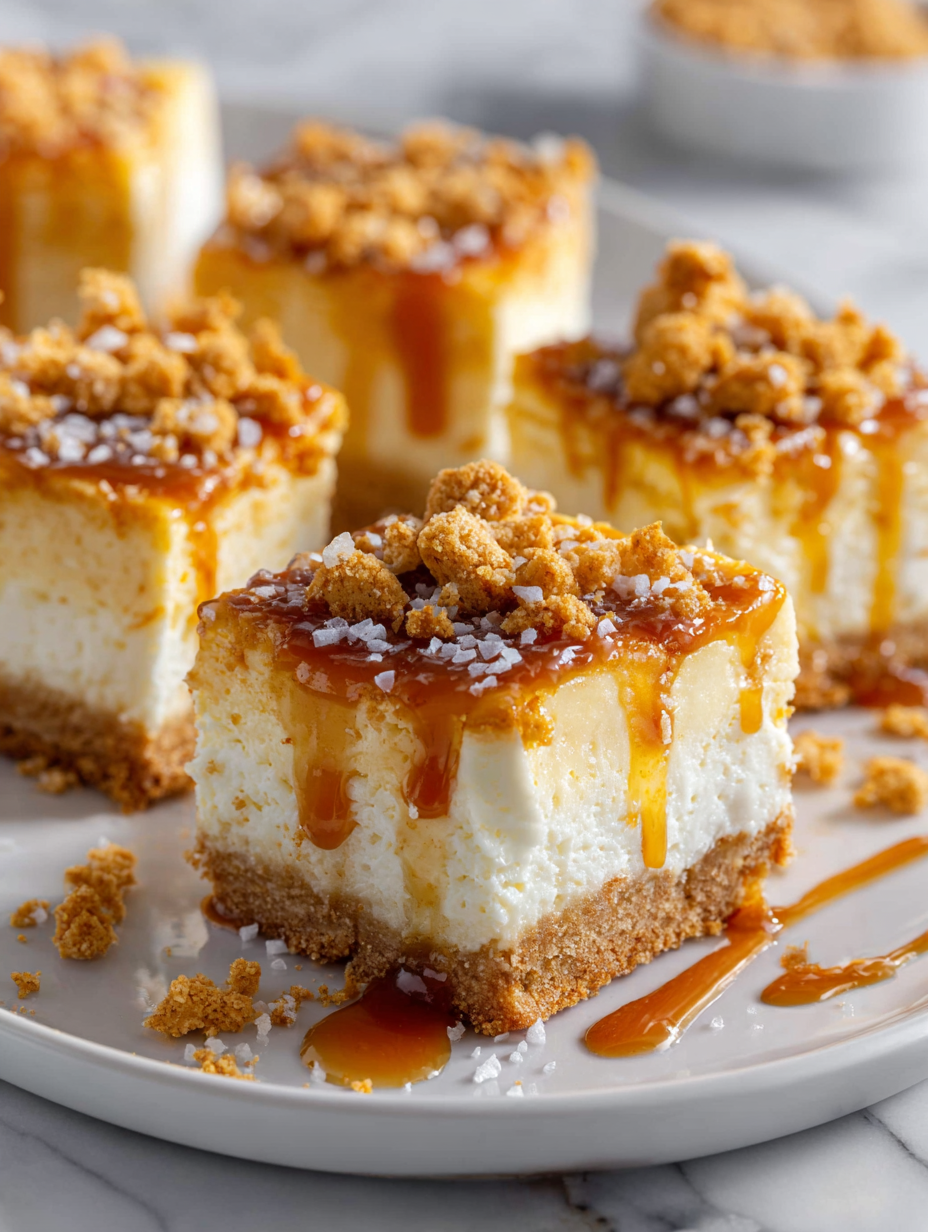
Cheesecake bars are my go-to for when I want dessert that’s rich but not overwhelming, and with a satisfying crunch on top. I’ve always loved a crust that’s thick and buttery, with just a touch of caramelized goodness, instead of the usual crumbly base. It’s that little extra texture that turns a simple cheesecake into something memorable.
This recipe started as an experiment during a hectic week, trying to recreate that nostalgic bakery vibe at home. I wanted a crust that could stand up to the creamy filling without turning soggy or losing its crunch. Turns out, a slightly caramelized, biscuit-like crust does the trick—perfect for slicing into neat bars and sharing around the table.
Focusing on creating cheesecake bars with a crust that’s thick, buttery, and slightly caramelized, reminiscent of a crumbled biscuit topping, adding a textured contrast to the smooth, tangy filling.
The story behind this recipe
- This recipe was born out of a messy weekend craving something creamy but with a little crunch. I remember pulling out ingredients late at night, feeling the comforting weight of cream cheese and butter, thinking about how a thick crust could elevate these bars beyond just another dessert. It’s funny how a simple idea—crisp crust, smooth filling—can turn into a little routine of comfort and pride on my kitchen counter.
- I’ve made these so many times now, I can’t help but smile when I see the edges caramelize just right. They remind me of lazy Sunday afternoons, sharing slices with friends or just savoring one with a strong cup of coffee. It’s that honest, imperfect joy of baking something straightforward and delicious, no fuss, just good flavors and textures.
- story_type
Ingredient breakdown: key components
- Cream Cheese: I prefer full-fat for that rich, velvety texture that melts in your mouth. If you want a lighter version, try Neufchâtel but expect slightly less creaminess.
- Butter: Unsalted butter gives me that buttery aroma and crisp crust. For a nuttier flavor, a touch of browned butter works beautifully—just watch it doesn’t burn.
- Graham Cracker Crumbs: I toast mine slightly before mixing—adds a subtle toasty depth and a satisfying crunch. Skip this step if you’re in a rush but do expect less complexity.
- Sugar: I use granulated for that clean sweetness that balances the tang of cream cheese. For a more caramelized flavor, brown sugar adds a darker, richer note.
- Eggs: I like to add a bit of extra yolk for creaminess, but just a single whole egg works fine. Make sure they’re at room temperature to blend smoothly and avoid curdling.
- Lemon Zest: A little zest brightens the filling with a zing of citrus. If you prefer a subtler flavor, reduce it or omit entirely; but I love that fresh, aromatic lift.
- Vanilla Extract: I always go for pure vanilla—adds depth and warmth. If you only have imitation, it’s okay, but it won’t be as fragrant or nuanced.
Spotlight on key ingredients
Cream Cheese:
- I prefer full-fat for that rich, velvety texture that melts in your mouth. If you want a lighter version, try Neufchâtel but expect slightly less creaminess.
- Butter: Unsalted butter gives me that buttery aroma and crisp crust. For a nuttier flavor, a touch of browned butter works beautifully—just watch it doesn’t burn.
- Graham Cracker Crumbs: I toast mine slightly before mixing—adds a subtle toasty depth and a satisfying crunch. Skip this step if you’re in a rush but do expect less complexity.
Lemon Zest & Vanilla:
- Lemon Zest: Adds a fresh, aromatic zing to the filling, waking up all the flavors with bright citrus notes. Use organic for the best impact.
- Vanilla Extract: I always go for pure vanilla—adds warmth and depth to the creamy filling. I love the fragrance that fills the kitchen when it’s in use.
Notes for ingredient swaps
- Dairy-Free: Use coconut cream cheese or cashew-based cheese for a similar tang and creamy texture, but expect a slightly different flavor profile.
- Sugar: Swap granulated sugar for honey or maple syrup; the bars will be a touch moister and have a richer, more complex sweetness.
- Butter: Replace with coconut oil or vegan margarine to make this recipe dairy-free; note that crust may be a bit crumblier.
- Graham Crackers: Use digestive biscuits or almond meal for a different flavor and texture; toast slightly for extra crunch.
- Lemon Zest: Omit or substitute with orange or lime zest for a different citrus note that brightens the filling.
- Sour Cream: Substitute with Greek yogurt or plant-based yogurt for a tangy flavor, but watch out for slight texture differences.
- Vanilla Extract: Use bourbon or almond extract for a unique twist; use sparingly to avoid overpowering the other flavors.
Equipment & Tools
- 9-inch square baking pan: Holds the crust and filling for baking and slicing.
- Mixing bowls: Combine ingredients smoothly.
- Spatula: Smooth the filling and press the crust.
- Electric hand mixer or stand mixer: Cream cheese and blend ingredients efficiently.
- Parchment paper: Prevent sticking and easy removal.
- Cooling rack: Allow the bars to cool evenly without sogginess.
- Knife with a serrated edge: Cleanly cut the chilled bars.
Step-by-step guide to cheesecake bars
- Preheat your oven to 180°C (350°F). Line a 9-inch square baking pan with parchment paper, leaving an overhang for easy removal.
- Mix the biscuit crumbs and sugar in a bowl. Melt butter and stir into the crumbs until evenly coated. Press this mixture firmly into the bottom of the prepared pan to form a thick crust. Bake for 12 minutes until golden around the edges, then set aside to cool slightly.
- Reduce oven temperature to 160°C (320°F). In a large bowl, beat the cream cheese until smooth and creamy, about 2 minutes. Add sugar and lemon zest, mix well. Incorporate eggs one at a time, beating just until combined. Mix in vanilla extract and sour cream until smooth.
- Pour the filling over the crust, smoothing the top with a spatula. Tap the pan gently on the counter to release any air bubbles.
- Bake for 30–35 minutes. The edges should be set, but the center will still jiggle slightly when shaken. The surface may crack slightly—this is normal.
- Remove from oven and let cool in the pan on a wire rack for 1 hour. Then, refrigerate uncovered for at least 4 hours, preferably overnight, to set fully and develop flavor.
- Before serving, cut into bars with a sharp knife, wiping the blade between cuts for clean edges. Optional: garnish with fresh berries or a dusting of powdered sugar.
Cool in the pan on a wire rack for 1 hour, then refrigerate uncovered for at least 4 hours or overnight. Slice with a sharp knife, wiping blade clean between cuts. Serve directly from the fridge for best texture and flavor.
How to Know It’s Done
- Crust is golden and firm, not soggy or greasy.
- Filling is set around the edges but slightly jiggly in the center.
- Surface has minor crackles without any raw batter showing.
Caramelized Biscuit Crust Cheesecake Bars
Ingredients
Equipment
Method
- Preheat your oven to 350°F (180°C). Line the baking pan with parchment paper, leaving overhang for easy removal.
- In a bowl, combine the toasted graham cracker crumbs and granulated sugar. Pour in the melted butter and mix with a spatula until the crumbs are evenly coated and resemble moist sand.
- Press this crumb mixture firmly into the bottom of the prepared pan, creating an even, thick crust. Bake for 12 minutes until it turns a light golden color and smells toasty. Remove from oven and let cool slightly.
- Reduce the oven temperature to 320°F (160°C). In a large mixing bowl, beat the softened cream cheese with an electric mixer until smooth and creamy, about 2 minutes.
- Add the remaining sugar and lemon zest to the cream cheese, mixing until well combined and fluffy.
- One at a time, beat in the eggs, mixing just until incorporated after each addition. Then, mix in vanilla extract and sour cream until the batter is smooth and silky.
- Pour the cheesecake filling over the cooled crust, smoothing the top with a spatula. Gently tap the pan on the counter to release any air bubbles.
- Bake for 30 to 35 minutes until the edges are set and lightly golden, with a slightly jiggly center. The surface may crack slightly, which is normal.
- Remove from oven and cool in the pan on a wire rack for about 1 hour. Then, refrigerate uncovered for at least 4 hours or overnight to set fully.
- Once chilled, lift the bars out of the pan using the parchment overhang. Cut into neat squares with a serrated knife, wiping the blade between slices for clean edges.
- Serve immediately or store in an airtight container in the fridge. Enjoy the crisp crust and creamy filling with a cup of coffee or tea!
Notes
Pro tips for cheesecake bars
- Bolded tip: Use room temperature cream cheese to ensure a smooth, lump-free filling that blends easily.
- Bolded tip: Press the crust mixture firmly with the back of a spoon for an even, compact base.
- Bolded tip: Bake the crust until lightly golden to develop a richer, caramelized flavor and crunch.
- Bolded tip: When mixing the filling, incorporate eggs one at a time to prevent curdling and keep it silky.
- Bolded tip: Gently tap the filled pan on the counter before baking to release air bubbles and prevent cracks.
- Bolded tip: Let the bars cool completely in the pan on a wire rack to avoid sogginess and ensure clean slicing.
- Bolded tip: Chill the finished bars uncovered overnight; this helps develop flavor and firm up the texture.
Common Cheesecake Bar Mistakes & Fixes
- FORGOT to chill the crust? Refrain from overbaking to prevent a tough base.
- DUMPED the water bath? Use a water bath to prevent cracking and overbaking.
- OVER-TORCHED the edges? Cover edges with foil mid-bake to avoid burning.
- MISSED cooling time? Always cool fully in the pan before refrigerating for clean cuts.
Fast fixes for cheesecake bars
- If mixture is too thick, splash in a teaspoon of milk to loosen it up.
- When crust crumbles, patch it with a little melted butter and press it back in.
- DUMPED the filling? Shield cracks with a dollop of extra cream cheese mixture and smooth over.
- Over-torched edges? Splash a little water on the edges and cover with foil to save the look.
- When bars stick, rescue with a sharp, warm knife and wipe clean between cuts.
Make-Ahead and Storage Tips
- Prepare and bake the crust up to 2 days ahead; keep it in an airtight container at room temperature for that crispy texture.
- Assemble and chill the cheesecake filling in the fridge for up to 24 hours before baking to let flavors meld and save time on the day of serving.
- Store baked cheesecake bars in an airtight container in the fridge for up to 3 days; the cold helps set the filling and intensify flavors.
- Reheat slices briefly in the microwave at medium power (about 15 seconds) until just warm—expect a soft, gooey texture and a fragrant aroma.
- For longer storage, freeze the bars wrapped tightly in plastic wrap and foil for up to 1 month; thaw in the fridge overnight for best texture.
Top questions about cheesecake bars
1. Can I substitute low-fat cream cheese?
Use full-fat cream cheese for the silkiest texture that melts in your mouth. Light versions can make it less creamy.
2. How do I know when the cheesecake is done?
Bake until the edges are golden and a toothpick inserted in the center comes out clean. The filling should jiggle slightly but not be liquid.
3. How long should I refrigerate before serving?
Chill the bars in the fridge uncovered for at least 4 hours or overnight. This helps set the filling and enhances flavor.
4. How do I get clean slices?
Use a sharp serrated knife, wiping it clean between cuts. For smooth edges, let the bars come to room temperature for a few minutes before slicing.
5. My crust is crumbly, what can I do?
If your crust crumbles, press it more firmly into the pan and bake a bit longer to set it properly.
6. Can I omit the lemon zest?
Add lemon zest for brightness and contrast to the richness. You can skip it or replace with orange zest for a different citrus note.
7. Why is my filling lumpy?
Use room temperature ingredients to ensure a smooth, lump-free filling. Cold ingredients can cause lumps and uneven mixing.
8. Should I use a water bath?
Bake in a water bath to prevent cracks and overbaking. Wrap the pan tightly in foil to prevent leaks.
9. How should I store leftover cheesecake bars?
Store leftover bars in an airtight container in the fridge for up to 3 days. For longer storage, freeze wrapped bars for up to a month.
10. Can I reheat the bars?
Reheat slices briefly in the microwave at medium power (about 15 seconds). Expect a soft, creamy texture and a fragrant aroma.
These cheesecake bars are simple but carry a quiet, satisfying richness that feels just right for sharing or savoring alone. The slight caramelization of the crust and the tangy creaminess of the filling create a layered experience that’s both nostalgic and fresh. It’s a reminder that good baking doesn’t need fuss—just honest ingredients and a little patience.
In a world that’s often hurried, taking the time to bake something like this reconnects me to the quiet joy of creating with my hands. Every bite has a story — of late nights, small wins, and the comfort of a straightforward, well-loved treat. Sometimes, that’s all you need to make an ordinary day feel a little more special.

Hi, I’m Benjamin Reynolds, the creator behind Strategically Seasoning. I started this blog because I believe great cooking is not random. It is thoughtful. It is intentional. It is built step by step with purpose. Seasoning is not something you sprinkle at the end and hope for the best. It is a strategy.

