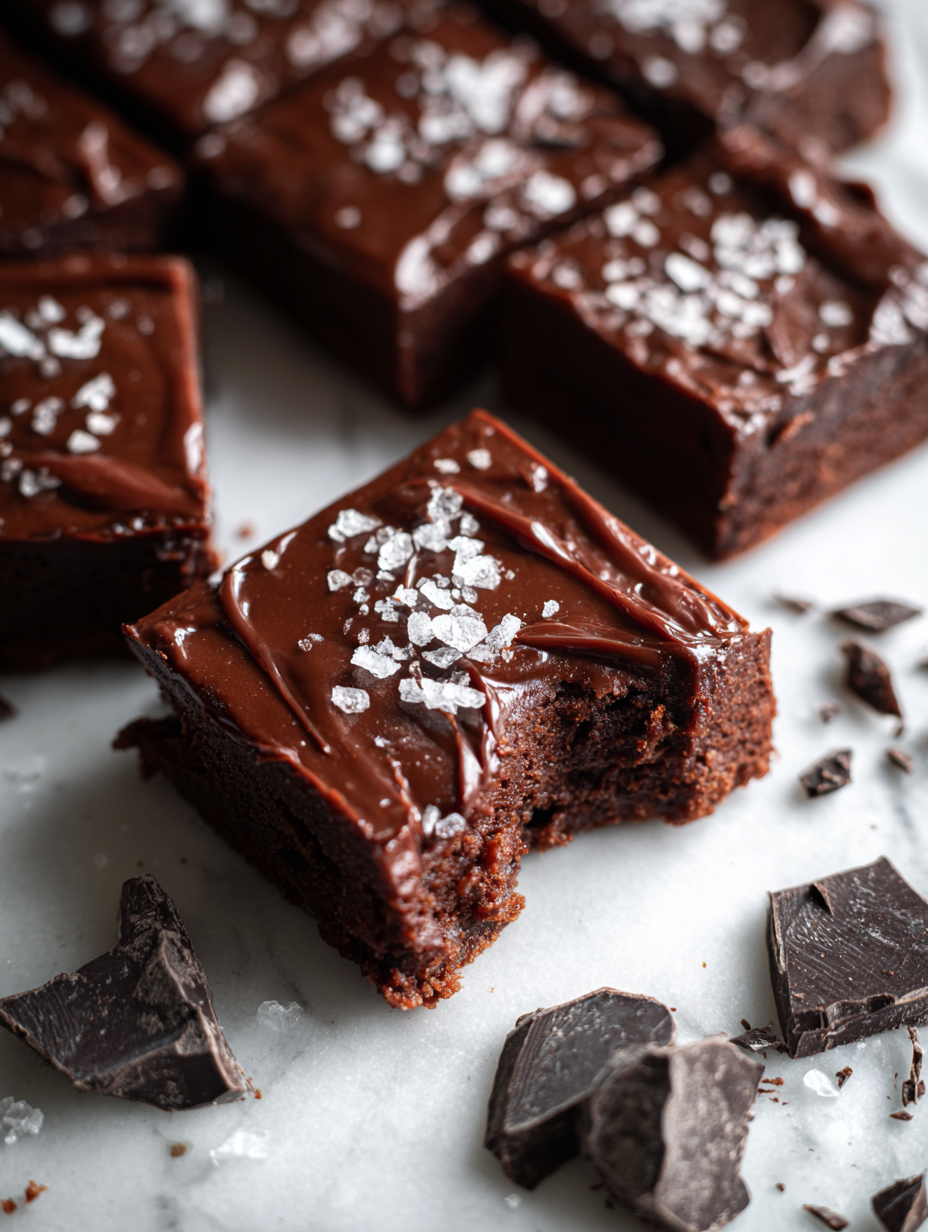
There’s something about homemade brownie bars that wraps you up in nostalgia, especially when you add a little smoky sea salt to the mix. It’s not just a treat; it’s a small reminder of childhood afternoons, sticky fingers, and the smell of melting chocolate. I love how a simple batch can turn a regular day into something special, even if it’s just for a quiet moment with a cup of coffee.
This recipe is about balance—rich, fudgy center with a hint of salt that makes everything pop. I’ve tweaked it over the years, trying to get that perfect chewy edge and gooey middle, and I think I finally nailed it. It’s honest, unpolished, and a little messy—just like baking should be. But when you cut through that crust and get to the melt-in-your-mouth chocolate, it’s all worth it.
Focusing on the nostalgic comfort of homemade brownie bars with a secret twist—adding a hint of smoky sea salt for a surprising depth that elevates the classic treat.
The story behind this recipe
- This recipe was born out of a messy Saturday afternoon, where I had a handful of chocolate chips and a craving for something rich but simple. I wanted that deeper, smoky note that reminded me of my grandma’s old bakery, where everything was a little imperfect but utterly delicious. The secret was always a pinch of sea salt that made the chocolate sing.
- I remember pulling a tray of these out of the oven, the smell of melted chocolate and caramelized sugar filling the whole kitchen. They were meant to be quick snacks, but somehow they turned into our weekend treat, shared over lazy conversations and sticky fingers. That’s when I knew: this recipe needed to be written down, for those perfect, imperfect moments that make baking worth it.
- story_type
Key ingredients and their quirks
- Unsweetened cocoa powder: I love that deep, slightly bitter punch it gives—use high-quality for that rich chocolate aroma, or swap in dark chocolate powder if you’re out but keep an eye on sweetness.
- Butter: I prefer salted for a little extra flavor complexity—melts into the batter, making the bars extra tender. Unsalted works fine, just add a pinch of salt to balance.
- Chocolate chips: Oozy, melty chunks that make each bite special. Semi-sweet chips are classic, but try dark or even white chips for a twist—just keep the sweetness balanced.
- Granulated sugar: It’s the backbone of that fudgy texture and crackly top. Brown sugar can add a caramel note if you’re feeling extra indulgent, but don’t skimp on the sweetness.
- Eggs: They bring structure and moisture—room temp eggs blend better, so give them a quick warm-up if cold. No shortcuts here, they’re key to that chewy crumb.
- All-purpose flour: I keep it light—measured carefully—to avoid a dense bar. If you want a richer texture, a little bit of almond flour can add nuttiness, but stick to the basics for that classic chew.
- Sea salt: A pinch of flaky sea salt on top right before baking elevates the chocolate and cuts through the richness—don’t skip this, even if it feels counterintuitive.
Spotlight on key ingredients
Cocoa powder, Butter, Chocolate chips:
- Unsweetened cocoa powder: I love that deep, slightly bitter punch it gives—use high-quality for that rich chocolate aroma, or swap in dark chocolate powder if you’re out but keep an eye on sweetness.
- Butter: I prefer salted for a little extra flavor complexity—melts into the batter, making the bars extra tender. Unsalted works fine, just add a pinch of salt to balance.
- Chocolate chips: Oozy, melty chunks that make each bite special. Semi-sweet chips are classic, but try dark or even white chips for a twist—just keep the sweetness balanced.
Notes for ingredient swaps
- Dairy-Free: Swap butter for coconut oil or vegan margarine. Expect a slightly different richness, more tropical aroma.
- Sweetener Variations: Use honey or maple syrup instead of sugar. These will add moisture and a subtle flavor twist.
- Chocolate Options: Dark chocolate chips or chunks can replace semi-sweet. They’ll bring a deeper, more intense cocoa flavor.
- Flour Alternatives: Almond or oat flour can be used for gluten-free bars. They’ll add nuttiness and slightly alter texture.
- Salt Types: Flaky sea salt on top is ideal, but regular coarse salt works too—just be mindful of saltiness. For a smoky note, try smoked sea salt.
- Add-ins: Nuts, dried fruit, or caramel bits can be mixed in. They add crunch or chew, so pick your favorite for variety.
- Cocoa Powder: Dutch-processed cocoa can be used for a mellower, less acidic chocolate flavor—adjust sugar if needed.
Equipment & Tools
- 9-inch square baking pan: Holds the batter during baking and helps shape the bars.
- Parchment paper: Eases removal and prevents sticking.
- Saucepan: For melting butter and mixing chocolate.
- Whisk: Combines wet ingredients smoothly.
- Spatula: Spreads batter evenly and smooths top.
- Toothpick or cake tester: Checks doneness of the bars.
Step-by-step guide to Brownie Bars
- Preheat your oven to 175°C (350°F). Grease a 9-inch square baking pan and line it with parchment paper, leaving an overhang for easy removal.
- Melt 1 cup (226g) of unsalted butter in a saucepan over low heat. Once melted, remove from heat and stir in 1 cup (85g) of unsweetened cocoa powder until smooth and shiny.
- In a mixing bowl, whisk together 1 1/2 cups (300g) of granulated sugar and 3 large eggs until well combined and slightly frothy, about 2 minutes.
- Pour the melted chocolate mixture into the eggs, stirring constantly to prevent curdling. Add 1 teaspoon (5ml) vanilla extract for depth.
- Sift together 1 cup (125g) of all-purpose flour and 1/2 teaspoon (3g) of sea salt. Gently fold into the wet ingredients until just combined; do not overmix.
- Stir in 1 cup (170g) of semi-sweet chocolate chips, distributing evenly throughout the batter. The batter should be thick and glossy.
- Pour the batter into the prepared pan, smoothing the top with a spatula. Sprinkle a pinch of flaky sea salt over the surface for contrast.
- Bake for 20-25 minutes. The edges should be set, but the center still slightly gooey when tested with a toothpick. The top will crack and look shiny.
- Remove from oven and let cool in the pan for at least 30 minutes. The bars will set as they cool, making them easier to cut.
- Using the parchment overhang, lift the bars out of the pan. Cut into squares or rectangles, about 1.5 inches wide, for neat servings.
- Finish with a light sprinkle of sea salt or a drizzle of melted chocolate if desired. Serve slightly warm or at room temperature.
Let the bars cool completely in the pan on a wire rack. Once cooled, lift out using the parchment edges. Cut into squares and serve with a sprinkle of sea salt or a drizzle of melted chocolate for extra flair.
How to Know It’s Done
- Edges are firm and slightly cracked, center is still soft but not runny.
- Toothpick inserted in center comes out with moist crumbs, not wet batter.
- Top has a shiny, crackled appearance with a slight sheen from melted chocolate.
Homemade Fudgy Brownie Bars with Smoked Sea Salt
Ingredients
Equipment
Method
- Preheat your oven to 175°C (350°F) and line your 9-inch square baking pan with parchment paper, leaving some overhang for easy removal.
- Melt the butter gently in a saucepan over low heat until it’s just melted and begins to shimmer, then remove from heat.
- Stir the cocoa powder into the melted butter until the mixture is smooth, shiny, and fragrant, with no lumps remaining.
- In a large bowl, whisk together the granulated sugar and eggs until the mixture is pale, slightly frothy, and well combined, about 2 minutes.
- Pour the warm chocolate mixture into the egg mixture, stirring constantly to create a silky, consistent batter, then add vanilla extract.
- Sift the flour and a pinch of sea salt into the wet ingredients, then gently fold until just combined; avoid overmixing to keep the batter tender.
- Stir in the chocolate chips evenly, ensuring they are distributed throughout the thick batter.
- Pour the batter into the prepared pan and smooth the top with a spatula for an even surface.
- Sprinkle a small pinch of flaky sea salt over the top, then bake in the preheated oven for about 20-25 minutes, until the edges are set and cracked, but the center still feels soft when gently pressed.
- Remove the pan from the oven and let the brownies cool in the pan for at least 30 minutes, allowing the center to set and develop that glossy, crackled surface.
- Lift the brownies out using the parchment overhang, then cut into squares or rectangles. Optionally, sprinkle a little more sea salt on top for extra flavor.
- Enjoy these rich, fudgy brownie bars at room temperature or warmed slightly for an extra gooey treat.
Notes
Pro Tips for Perfect Brownie Bars
- Use high-quality cocoa powder for a rich, deep chocolate flavor that really stands out.
- Melt butter gently over low heat to avoid splattering and to keep the flavor silky and smooth.
- Incorporate chocolate chips while the batter is still warm for extra oozy pockets in every bite.
- Chill the batter in the fridge for 15-20 minutes if it feels too soft—this makes spreading easier and prevents spreading during baking.
- For a crackly top, do not overmix once the eggs are added; just fold until combined to keep the surface shiny and textured.
- Bake until edges are firm and center is just set—use the crackling surface as your visual cue for perfect doneness.
- Sprinkle flaky sea salt just before baking ends to enhance the chocolate’s aroma and add a surprising crunch.
Common Brownie Bar Mistakes & Fixes
- FORGOT to check oven temperature → Use an oven thermometer for accuracy.
- DUMPED in too much salt → Reduce salt, especially if using flaky or finishing salts.
- OVER-TORCHED the edges → Cover with foil halfway through baking to prevent burning.
- MISSED the cooling step → Always cool completely for clean cuts and proper texture.
Quick Fixes & Pantry Swaps
- If the batter is too thick, splash in a teaspoon of milk to loosen it.
- When the edges burn quickly, shield with foil mid-bake and reduce oven temperature slightly.
- Splash a little hot water on stubborn chocolate chips to help them melt evenly.
- Patch a cracked top by gently pressing it back together with a spatula during baking.
- Shield the underside with foil if the bottom starts to over-torch while the top is still soft.
Prep, store, and reheat tips
- Prepare and bake the brownie base a day in advance; it firms up nicely in the fridge, making slicing easier and cleaner.
- Store cooled bars in an airtight container at room temperature for up to 3 days; they develop a richer chocolate aroma over time.
- For longer storage, wrap bars tightly in plastic wrap and keep in the freezer for up to 2 months; thaw at room temperature before serving.
- Reheat individual squares in the microwave for about 10-15 seconds until warm and gooey, with aroma of melted chocolate filling the room.
- Refrigerated or frozen brownies may lose some of their initial fudgy texture; reheating restores some of that soft, melty feel.
Brownie Bars Recipe FAQs
1. How do I know when brownie bars are done?
Look for shiny, crackled tops and a toothpick coming out with moist crumbs, not wet batter. If it’s underbaked, bake a few more minutes, but avoid overdoing it to keep that fudgy texture.
2. Why are my brownie bars dense or dry?
Use room temperature eggs for smooth mixing and even rise. Cold eggs can cause the batter to seize or not combine well, resulting in uneven texture.
3. My brownies are cracking on top—what’s wrong?
If the top cracks too much, cover the pan with foil halfway through baking to retain moisture. For a more gooey center, slightly underbake and let cool slowly.
4. How should I store leftover brownie bars?
Storing in an airtight container at room temp keeps them fresh for about 3 days. For longer storage, freeze wrapped bars for up to 2 months and reheat briefly before serving.
5. Can I reheat the brownie bars?
Reheat in the microwave for 10-15 seconds until warm and gooey, or enjoy at room temperature for that perfect bite. Reheating helps restore the fudgy texture and aroma of melted chocolate.
6. Can I make these brownies dairy-free?
Yes! Use dairy-free margarine or coconut oil instead of butter. Expect slightly different richness and texture, but still delicious and moist.
7. Can I use a different sweetener?
Substitute honey or maple syrup for sugar for a different sweetness profile. These add moisture and a subtle flavor twist, but may slightly alter baking time.
8. Can I change the chocolate chips?
Dark chocolate or white chocolate chips can replace semi-sweet, giving a different flavor punch—dark for deeper cocoa, white for sweetness contrast.
9. What flour can I use instead of all-purpose?
Almond or oat flour can be swapped in for gluten-free options. These add nuttiness and a slightly different crumb—expect a denser, more textured bar.
10. Should I add salt on top?
Flaky sea salt sprinkled on top before baking enhances the chocolate flavor and adds a crunch. Use regular coarse salt if you don’t have sea salt, just be mindful of saltiness.
These brownie bars are more than just a sweet treat; they’re a reminder that simple ingredients and a little bit of chaos can lead to something unexpectedly delightful. The smoky sea salt elevates each bite, making every mouthful feel like a small celebration. They’re perfect for whenever you need a quick indulgence that’s honest, a little messy, and deeply satisfying.
In a world rushing by, it’s nice to have a recipe that encourages a bit of imperfection and a lot of flavor. Whether shared with friends or enjoyed solo during a quiet moment, these bars bring a comforting, nostalgic warmth that’s hard to beat. Sometimes, the best baking moments are the ones that feel a little unpolished but taste utterly right.

Hi, I’m Benjamin Reynolds, the creator behind Strategically Seasoning. I started this blog because I believe great cooking is not random. It is thoughtful. It is intentional. It is built step by step with purpose. Seasoning is not something you sprinkle at the end and hope for the best. It is a strategy.

