Overripe bananas often get pushed to the back of the fruit bowl, ignored until they turn black and mushy. But those bananas hold so much sweet, natural flavor just waiting to be transformed into something more than just a snack—they become the base for these no-fuss banana oat bars. I love how this recipe turns kitchen scraps into a satisfying treat, cutting down on waste while satisfying that craving for something cozy and wholesome.
What I really appreciate about these bars is how forgiving they are. No need for fancy ingredients or precise measurements—just ripe bananas, oats, and whatever nuts or seeds you have on hand. They’re perfect for those mornings when you want a quick breakfast or an afternoon pick-me-up that feels like a little bit of comfort in every bite. Plus, the smell as they bake is a warm reminder of childhood kitchens, simple and honest.
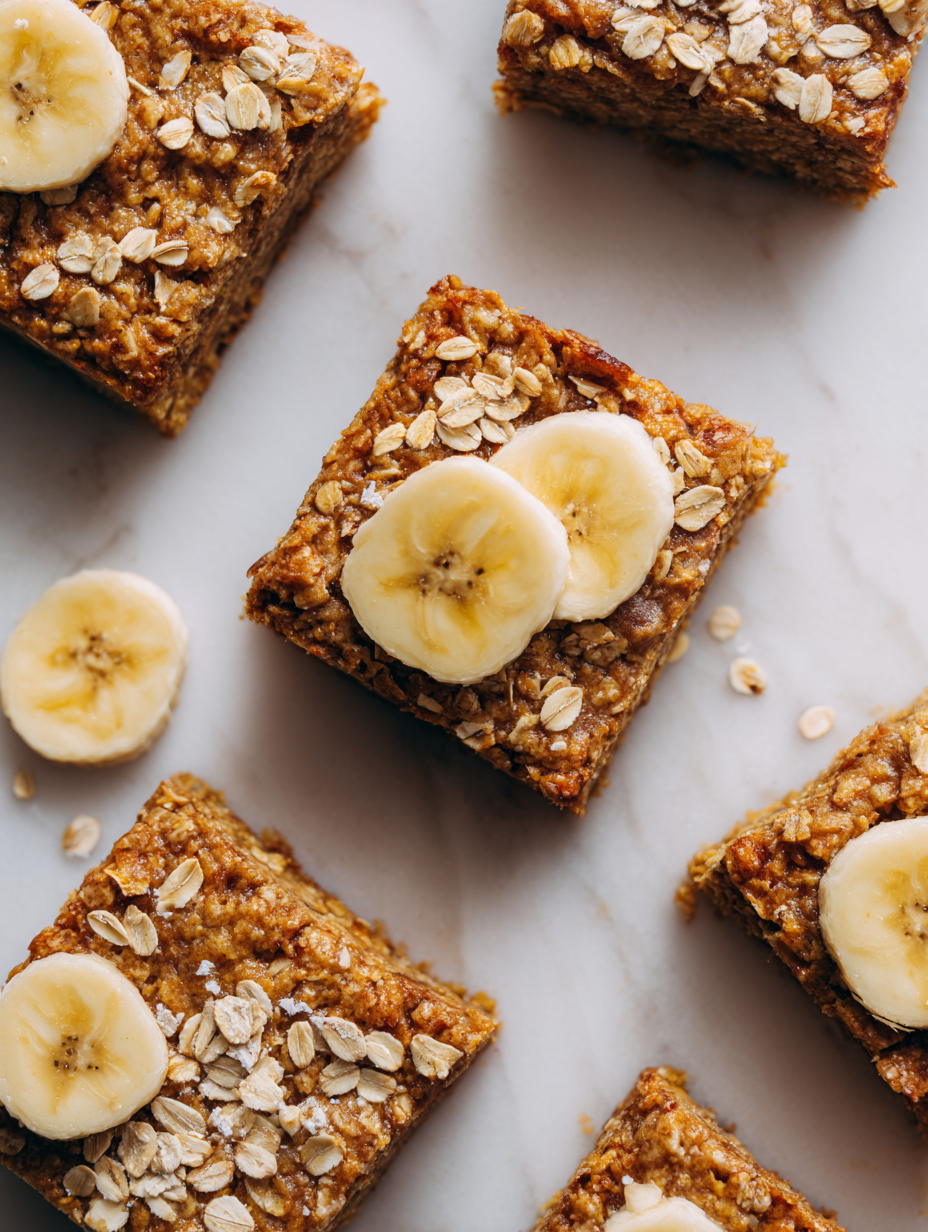
Focusing on how overripe bananas can be transformed into a comforting, no-fuss snack bar that minimizes waste and maximizes flavor, turning kitchen scraps into something sweet and satisfying.
The inspiration behind these bars
- This recipe was born out of a lazy Saturday morning. I had a bunch of overripe bananas that no one was eating, and I didn’t want to toss them. Instead of making banana bread, I thought, why not turn them into something portable, like bars? The idea of creating a snack that’s both satisfying and reduces waste keeps coming back to me whenever I have too many bananas languishing on the counter.
- I remember the first batch coming out of the oven, smelling sweet and earthy, the oats just starting to toast slightly—kind of that cozy smell that makes you want to curl up with a good book. It’s become a go-to recipe when I need a quick fix that feels nourishing but doesn’t require much fuss. Plus, it’s a good way to sneak in some fiber and fruit into busy mornings or kids’ lunch boxes.
- story_type
- paragraph
Ingredient breakdown: essentials and tweaks
- Bananas: I love how overripe bananas turn sweet and jammy, which makes the bars naturally sweet. If yours are just ripe, add a little honey or maple syrup for extra sweetness.
- Rolled oats: They give these bars that hearty, chewy texture I crave. Toast them lightly before mixing if you want a nuttier flavor and more aroma.
- Nut butter: I prefer almond or peanut—adds richness and helps hold everything together. For a nut-free version, try sunflower seed butter, though it’s a bit thinner.
- Sweetener: Sometimes I toss in a splash of honey or a sprinkle of brown sugar. If you want to skip it, just ensure your bananas are super ripe for enough sweetness.
- Add-ins: Nuts, seeds, or dried fruit are my staples. Toasted walnuts or chia seeds add crunch and texture. Don’t overdo it—they can weigh down the bars.
- Baking time: Keep an eye on the edges—they should turn golden, and the center will firm up as it cools. If it’s still gooey after 20 minutes, give it a few more.
- Salt: Just a pinch heightens the sweetness and rounds out the flavors. I always forget it, then wonder why it tastes flat—don’t skip it!
Spotlight on key ingredients
Bananas:
- I love how overripe bananas turn sweet and jammy, which makes the bars naturally sweet. If yours are just ripe, add a little honey or maple syrup for extra sweetness.
- They become gooey and oozy when mashed, helping to bind the bars without fuss. Watch for a deep golden hue as they bake—that’s your cue to check for doneness.
Rolled oats:
- They give these bars that hearty, chewy texture I crave. Toast them lightly before mixing if you want a nuttier flavor and more aroma.
- During baking, they toast slightly, releasing a cozy, toasted aroma that makes the whole kitchen smell like breakfast. They also add a satisfying chew with every bite.
Notes for ingredient swaps
- Dairy-Free: Use coconut oil or plant-based butter instead of butter for richness without dairy, keeping the bars subtly tropical.
- Sweetener: Swap honey for maple syrup or agave nectar; each will add a different nuance of sweetness and moisture.
- Nut Butter: Almond or cashew butter can replace peanut or almond; they alter the flavor but maintain that creamy, binding quality.
- Oats: For gluten-free, choose certified gluten-free rolled oats; they behave just like regular oats in texture and baking.
- Add-ins: Dried cranberries instead of raisins add a tart punch, or chocolate chips for a sweet melty surprise.
- Bananas: Use mashed cooked sweet potato or pumpkin for a different flavor profile, still adding moisture and softness.
- Flavor Boost: Stir in a pinch of cinnamon or cardamom to warm up the aroma and add depth to the bars.
Equipment & Tools
- Oven: To bake the bars evenly.
- Mixing bowls: To combine ingredients comfortably.
- Fork: To mash bananas smoothly.
- Skillet: To toast oats and develop flavor.
- Spatula: To press mixture into the pan and spread smoothly.
- Parchment paper: To prevent sticking and make removal easier.
- Knife: To slice cooled bars.
Step-by-step guide to Banana Oat Bars
- Preheat your oven to 175°C (350°F). Line a 20x20cm (8×8 inch) baking pan with parchment paper, leaving some overhang for easy removal. Gather your ingredients and tools.
- In a large mixing bowl, mash 3 ripe bananas with a fork until smooth. This gives a sweet, jammy base that naturally sweetens the bars. Set aside.
- In a dry skillet over medium heat, toast 1 cup of rolled oats for 2-3 minutes until fragrant and slightly golden. Stir constantly to prevent burning. This adds nuttiness and aroma.
- Add 1/2 cup of nut butter (almond or peanut) to the mashed bananas. Mix until well combined. This helps hold the bars together and adds richness.
- Stir in 1/4 cup of honey or maple syrup if extra sweetness is desired. Adjust to taste. For less sweet, skip or reduce. Mix thoroughly.
- Incorporate 1/2 teaspoon of salt and 1 teaspoon of vanilla extract into the mixture. These deepen the flavor. Optional: fold in 1/4 cup of dried fruit or nuts for texture.
- Add the toasted oats to the banana mixture. Mix until evenly coated. The texture should be thick but spreadable.
- Transfer the mixture to the prepared baking pan. Use a spatula or the back of a spoon to press it evenly into the pan. Aim for a compact, level surface.
- Bake in the preheated oven for 20-25 minutes. Edges should turn golden brown, and the center will look set but still slightly soft. Your house will fill with a warm, toasted aroma.
- Remove from oven and let cool in the pan for 10 minutes. Then, transfer to a wire rack and cool completely for at least 30 minutes. This helps the bars firm up for clean slicing.
- Once cooled, slice into squares or rectangles. Serve immediately or store for later. The bars will be chewy with a slight crisp on the edges.
- For best texture, wait at least an hour before storing in an airtight container. Keeps well at room temperature for 3 days, or refrigerated for up to a week.
Cool the baked mixture in the pan for 10 minutes, then transfer to a wire rack. Let cool completely for 30 minutes to set firm. Slice into squares and serve or store in an airtight container.
How to Know It’s Done
- Edges are golden and slightly crisp when baked.
- Center feels firm and no longer jiggles when gently pressed.
- Bars hold together when sliced without crumbling.
No-Fuss Banana Oat Bars
Ingredients
Equipment
Method
- Preheat your oven to 175°C (350°F) and line an 8x8 inch baking pan with parchment paper, leaving overhang for easy removal.
- Peel the ripe bananas and mash them thoroughly with a fork until smooth and jammy, with some small lumps for texture.
- In a dry skillet over medium heat, toast the oats for 2-3 minutes until fragrant and slightly golden, stirring constantly to prevent burning.
- In a large bowl, combine the mashed bananas with the nut butter and stir until smooth and well mixed.
- Add the honey or maple syrup, salt, and vanilla extract to the banana mixture, stirring until evenly incorporated.
- Fold in the toasted oats and any optional add-ins like dried fruit or nuts, mixing gently until everything is evenly coated and combined.
- Transfer the mixture into the prepared baking pan, pressing down firmly with a spatula or the back of a spoon to create an even layer.
- Bake for 20-25 minutes, until the edges are golden brown and the center feels set but still a little soft.
- Remove from the oven and let cool in the pan for at least 10 minutes, then transfer to a wire rack and cool completely for about 30 minutes to set.
- Once cooled, lift the bars out of the pan using the parchment overhang and slice into squares or rectangles.
- Enjoy immediately or store in an airtight container at room temperature for up to 3 days, or refrigerate for up to a week.
- For longer storage, wrap individual bars in plastic wrap and freeze for up to a month. Reheat briefly or enjoy chilled for a quick, wholesome snack anytime.
Pro tips for perfect banana oat bars
- Bold Oats: Toast oats lightly before mixing for a nutty aroma and a deeper flavor dimension.
- Gentle Mash: Use the back of a fork to mash bananas until nearly smooth—still some small chunks add texture.
- Even Pressing: Use the back of a spatula or a glass to firmly press the mixture into the pan for uniform baking.
- Watch the Edges: Keep an eye on the browning edges; they should be golden and slightly crisp when ready.
- Cooling Matters: Let the bars cool completely before slicing; hot bars are too soft and may crumble.
- Customize Sweetness: Adjust the honey or syrup based on your banana ripeness—overripe bananas are sweet enough for most tastes.
- Add Nutty Crunch: Incorporate a handful of toasted nuts or seeds for extra texture and flavor contrast.
Common mistakes and how to fix them
- FORGOT to set a timer → Check every 20 minutes to avoid over-baking.
- DUMPED in all ingredients at once → Mix ingredients gradually for even distribution.
- OVER-TORCHED the edges → Shield with foil if edges brown too quickly.
- MISSED the cooling step → Cool completely to prevent crumbling when slicing.
Quick kitchen fixes for banana oat bars
- WHEN bananas are too mushy, add a sprinkle of oats for texture and absorb excess moisture.
- IF mixture feels too dry, splash in a teaspoon of water or milk to loosen it.
- WHEN bars crack when slicing, let them rest longer to firm up fully.
- DUMPED in too many add-ins? Reduce or skip to keep bars from becoming dense and heavy.
- SPLASH a little lemon juice over bananas if they brown before baking to keep flavor bright.
Prep, store, and reheat tips
- Prep the mashed bananas and toasted oats a day ahead; store separately in airtight containers in the fridge. They’ll stay fresh for up to 24 hours and save time when baking.
- Assemble the mixture just before baking to keep the oats crunchy and bananas bright. Once baked, the bars can be stored at room temperature in an airtight container for 3 days, or refrigerated for up to a week.
- For longer storage, wrap bars individually in plastic wrap and freeze for up to 1 month. Thaw at room temperature, or reheat briefly in the microwave until warm and fragrant.
- Reheating brings out the cozy aroma; warm bars for about 10 seconds in the microwave until they shimmer slightly and smell toasted. They’ll lose some chewiness but gain back that just-baked feel.
Top questions about Banana Oat Bars
1. How ripe should bananas be for the best flavor?
Use overripe bananas with a deep brown peel and a soft, jammy texture. They’re sweet and mash easily, giving your bars that rich banana flavor.
2. Can I substitute other sweeteners?
Yes, you can swap honey or maple syrup for agave or coconut nectar. The flavor will be slightly different, but sweetness remains balanced.
3. What nut butters work best?
Use nut butter like almond, peanut, or cashew. For a nut-free version, sunflower seed butter works but adds a slightly different flavor and texture.
4. Are oats gluten-free?
To keep the bars gluten-free, choose certified gluten-free oats. They behave just like regular oats, giving a hearty chew.
5. What add-ins can I include?
Add dried cranberries or chopped dried apricots for tartness, or chocolate chips for a sweet melty surprise that kids love.
6. How do I know when the bars are done?
Bake until the edges are golden and the center feels firm but not hard—this usually takes about 20-25 minutes at 175°C (350°F).
7. How should I cool the bars?
Cool the bars completely in the pan, then transfer to a wire rack before slicing. This helps them set and prevents crumbling.
8. How long do these bars last?
Store in an airtight container at room temperature for up to 3 days, or refrigerate for a week. For longer, freeze wrapped bars for up to a month.
9. How can I reheat or refresh leftovers?
Reheat in the microwave for about 10 seconds until they shimmer and smell toasted. For a crunchier texture, re-bake briefly at 180°C (350°F).
10. What if the mixture is too dry or too wet?
If the mixture feels too dry, splash in a teaspoon of milk or water. Too wet? Add a handful of oats to absorb excess moisture.
These banana oat bars are a quiet reminder that simple ingredients, when treated with care, can turn into something truly comforting. I find myself reaching for one when I need a quick, honest snack that satisfies without fuss.
They’re not flashy, but they carry a warmth that feels right for now—whether it’s a busy morning, a lazy afternoon, or a moment to pause and enjoy the smell of toasted oats and sweet bananas. Nothing fancy, just good, honest baking that keeps you coming back.

Hi, I’m Benjamin Reynolds, the creator behind Strategically Seasoning. I started this blog because I believe great cooking is not random. It is thoughtful. It is intentional. It is built step by step with purpose. Seasoning is not something you sprinkle at the end and hope for the best. It is a strategy.

