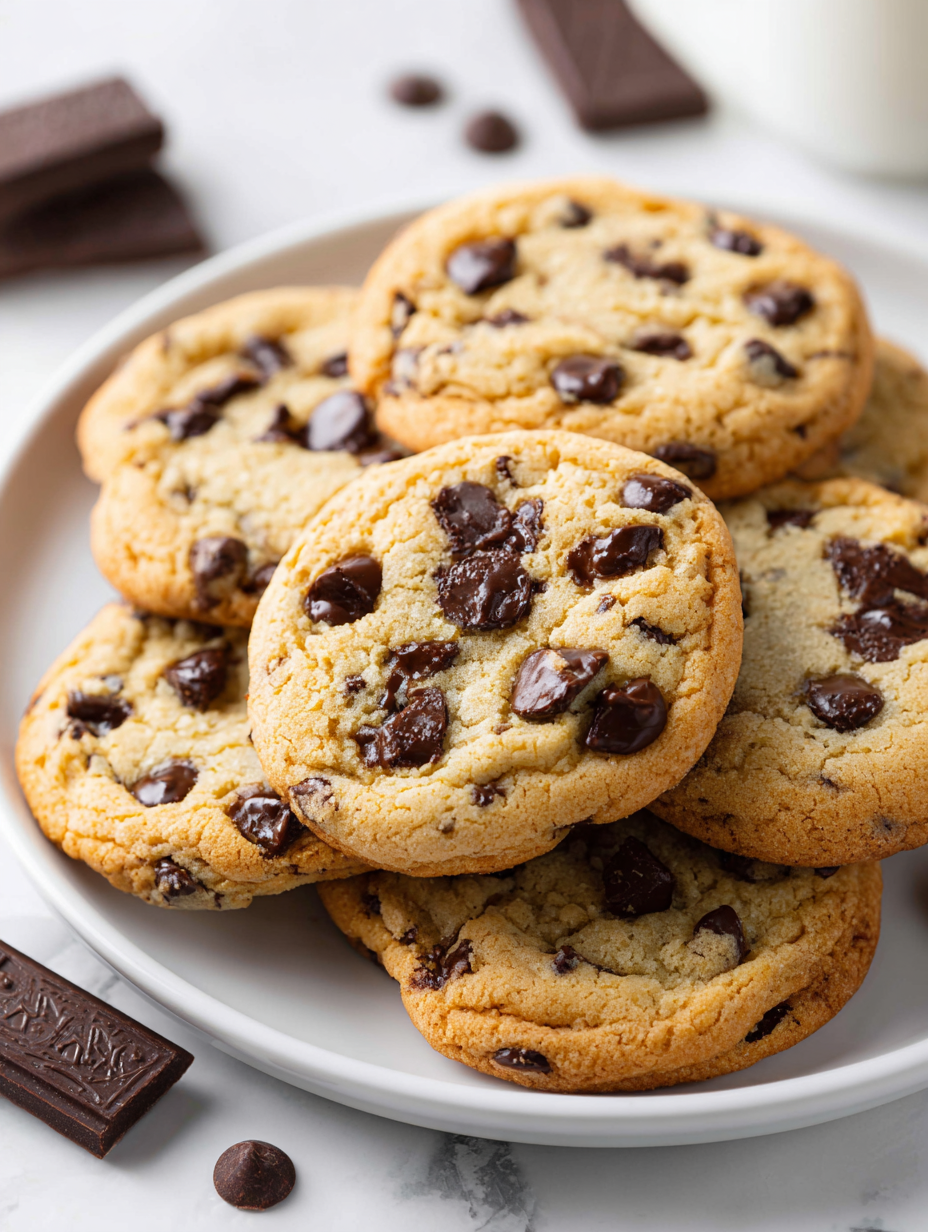
Most recipes focus on the perfect cookie dough or the ideal baking time, but I find the real magic lies in balancing the texture—crisp edges with a chewy center. It’s a dance of ingredients and timing that transforms a humble chocolate chip cookie into something more interesting than just a sweet snack.
Over the years, I’ve tinkered with different flours, butter ratios, and even baking sheets to get that contrast just right. It’s not about making them perfect — it’s about understanding how each tweak changes the bite, the smell, the way the chocolate melts. That little bit of chaos in the process keeps me coming back for more.
Focusing on the overlooked art of balancing crisp edges with chewy centers in chocolate chip cookies, I explore how slight adjustments in baking times and ingredient ratios can create the perfect contrast, elevating a simple comfort food into a nuanced treat.
The story behind this recipe
- This recipe comes from a messy afternoon in my kitchen, where I was trying to recreate my grandma’s cookies, but with a bit more chew and a little less sweetness. I realized the secret was in the balance of butter and chocolate, and a touch of patience in baking. Those cookies turned out to be a revelation, not perfect but honest and deeply satisfying.
- Over time, I kept tweaking the recipe, trying to get that perfect chewy center with crispy edges. Each batch tells a small story—about what I was craving, who I was sharing it with, or just the weather outside. It’s a humble recipe, but it’s become my go-to comfort, especially when I need a little reminder of home.
- heading
- The story behind this recipe
Key ingredients and their quirks
- Unsalted butter: I prefer using softened butter for even mixing, which gives a smoother dough. You can try melted butter for a chewier texture, but watch the baking time. The smell of melting butter always hints at good things to come.
- Granulated sugar: I like a bit more sugar to boost the caramelization and deepen the flavor. If you want less sweetness, cut back slightly, but expect a less golden crust and a softer bite.
- Brown sugar: It adds moisture and a rich, molassy note that makes the cookies irresistibly chewy. Use dark brown for a more intense flavor, or light brown if you prefer a milder sweetness.
- Eggs: I often beat the eggs first to incorporate air, which helps the cookies rise just a tad. For a denser cookie, use slightly fewer eggs, but don’t skip them—they’re the glue that holds everything together.
- Chocolate chips: I love semi-sweet for balance, but chunky chunks or even dark chocolate pieces can add an unexpected richness. The way the chips ooze slightly as you bite makes all the difference. Keep some aside to sprinkle on top before baking for extra gooeyness.
- Flour: I stick to all-purpose, but cake flour can make them lighter and softer. Too much flour, and the cookies turn crumbly. Sift it well to avoid lumps and get that tender crumb.
- Baking soda: It helps with spread and browning. A tiny pinch is enough—too much and the cookies can turn metallic-tasting. When you see the edges turn a deep golden, you’re almost there.
Spotlight on key ingredients
Chocolate Chips:
- I prefer semi-sweet for balance, but chunky chunks melt into gooey pockets. They ooze slightly when warm and add that essential rich, sweet contrast.
- Butter: I use softened unsalted butter to achieve a tender crumb. During baking, it melts and creates a fragrant, golden aroma, crucial for flavor and texture.
Brown Sugar & Butter:
- Brown Sugar: It adds moisture and a deep caramel flavor, making the cookies chewy and rich. The molasses in it gives that dark, inviting hue and a slightly sticky texture during mixing.
- Unsalted Butter: Creamed with sugar until fluffy, it forms the base of a tender, flavorful cookie. Its melting point influences the cookie’s spread and crispness around the edges.
Notes for ingredient swaps
- Dairy-Free: Swap butter for coconut oil or margarine. Expect a slightly different texture and a hint of coconut aroma.
- Sugar Alternatives: Use honey or maple syrup instead of granulated sugar. Cookies may spread more and taste a bit richer.
- Gluten-Free: Replace all-purpose flour with a blend of almond flour and gluten-free baking mix. Keep an eye on texture, they might be crumblier.
- Vegan: Use vegan butter and dairy-free chocolate chips. The flavor remains rich, but texture might be slightly softer.
- Dark Chocolate: Substitute semi-sweet chips with high-quality dark chocolate chunks. Expect a more intense, slightly bitter chocolate hit.
- Nutty Twist: Add chopped toasted nuts like pecans or walnuts. They bring a satisfying crunch and nutty aroma.
- Extra Vanilla: Increase vanilla extract to 2 teaspoons for a more pronounced aroma and flavor boost.
Equipment & Tools
- Mixing bowl: To combine ingredients thoroughly.
- Mixer (hand or stand): To cream butter and sugar smoothly.
- Baking sheet: To hold cookies during baking.
- Parchment paper: To prevent sticking and promote even baking.
- Cooling rack: To cool cookies evenly without sogginess.
Step-by-step guide to chocolate chip cookies
- Gather your equipment: a mixing bowl, a hand or stand mixer, a baking sheet, parchment paper, and a cooling rack.
- Preheat your oven to 180°C (350°F). Line the baking sheet with parchment to prevent sticking.
- In the mixing bowl, cream together 1 cup softened unsalted butter and 1 cup granulated sugar on medium speed for about 2 minutes, until light and fluffy. The smell should be buttery and sweet.
- Add 1 large egg and 1 teaspoon vanilla extract. Beat until well combined, about 30 seconds. The mixture will loosen and look glossy.
- In a separate bowl, whisk together 2 cups all-purpose flour, 1/2 teaspoon baking soda, and a pinch of salt. Gradually add to the creamed mixture, mixing on low until just combined. The dough should be soft but hold together.
- Fold in 1 to 1 1/2 cups chocolate chips with a spatula. You want the chips evenly dispersed, and the dough slightly sticky but manageable.
- Using a cookie scoop or tablespoons, portion out dough onto the prepared baking sheet, spacing about 5 cm (2 inches) apart. Gently press a few extra chips on top for a more inviting appearance.
- Bake for 10–12 minutes. The edges should be golden brown and slightly crisp, while the centers look soft and slightly underbaked. The smell will be warm and chocolaty.
- Remove from oven and let the cookies sit on the baking sheet for 5 minutes. Then transfer to a cooling rack to cool completely. They will firm up and develop a chewy center with crispy edges.
- Rest for at least 15 minutes before serving. This allows the flavors to settle and the texture to perfect. Serve with a glass of milk or just as they are.
Allow cookies to rest on the rack for 15 minutes. Serve warm or at room temperature, pairing with milk or coffee if desired.
How to Know It’s Done
- Edges are golden brown and firm to the touch.
- Center remains soft and slightly jiggly but not raw.
- Chocolate chips are oozy and melty when bitten into.
Perfect Chocolate Chip Cookies
Ingredients
Equipment
Method
- Start by lining your baking sheet with parchment paper to ensure easy cleanup and even baking.
- In a large mixing bowl, cream together softened butter and granulated sugar using a mixer on medium speed for about 2 minutes, until the mixture appears light, fluffy, and slightly pale in color, with a fragrant buttery aroma.
- Add the large egg and vanilla extract to the creamed mixture, then beat on low speed until fully incorporated, about 30 seconds. The mixture should look glossy and slightly loosened.
- In a separate bowl, whisk together sifted all-purpose flour and baking soda to ensure even distribution, then gradually add this dry mixture to the wet ingredients while mixing on low speed. Mix just until the flour is incorporated; the dough will be soft and slightly sticky.
- Gently fold in the chocolate chips with a spatula, dispersing them evenly throughout the dough. The dough should be tacky but manageable, with some chips visible on the surface.
- Using a cookie scoop or tablespoon, portion out rounded dough balls onto the prepared baking sheet, spacing them about 5 cm (2 inches) apart to allow for spreading. Gently press a few extra chocolate chips on top of each cookie for an inviting, gooey appearance.
- Bake the cookies in a preheated oven at 180°C (350°F) for 10–12 minutes. Watch for the edges to turn a deep golden brown and the centers to look slightly underdone but set; your kitchen will fill with a warm, chocolaty aroma.
- Once baked, remove the cookies from the oven and let them sit on the baking sheet for about 5 minutes—this helps them set and prevents breakage when transferring.
- Transfer the cookies carefully to a cooling rack and allow them to cool completely for 15 minutes. This final resting period enhances their chewy center and crispy edges, making them perfect for eating.
- Enjoy your cookies warm or at room temperature with a glass of milk or your favorite beverage, savoring the delightful contrast of textures and rich chocolate flavor.
Pro tips for perfect chocolate chip cookies
- Chill the dough for at least an hour to develop deeper flavors and improve texture.
- Use a light hand when mixing in chocolate chips to prevent breaking or over-mixing.
- Slightly underbake cookies; they will firm up as they cool, ensuring a chewy center.
- Rotate the baking sheet halfway through baking to promote even browning.
- For extra gooey cookies, remove from oven when edges are golden but centers still look slightly soft.
- Sprinkle a few extra chips on top before baking for a more decadent, melty appearance.
- Let cookies rest for 10–15 minutes on the baking sheet to finish setting before transferring.
Common mistakes and how to fix them
- FORGOT to check oven temperature → Use an oven thermometer for accuracy.
- DUMPED too much flour → Sift flour and measure accurately to avoid dryness.
- OVER-TORCHED cookies → Remove when edges are golden, not dark brown.
- UNDERBaked centers → Bake a minute longer if centers remain soft and jiggle excessively.
Quick fixes and pantry swaps
- If cookies spread too much → Chill dough for 30 minutes before baking.
- When chocolate chips look dull → Increase baking time slightly for better melt.
- Splash a little milk if cookies are too dry after baking.
- Patch under-baked centers by baking cookies for an extra minute.
- Shield burnt edges by covering with foil and lowering oven temperature.
Prep, store, and reheat tips
- Prepare the cookie dough up to 24 hours in advance, then cover and chill in the fridge for a richer flavor and better texture. The smell of chilled dough is unexpectedly comforting.
- Baked cookies can be stored in an airtight container at room temperature for up to 3 days. Expect them to stay chewy on the inside with a slight crisp on the edges.
- For longer storage, freeze baked cookies for up to 1 month. Thaw at room temperature, or warm in the oven at 150°C (300°F) for 5 minutes until just warm and fragrant.
- Reheat cookies briefly in a 150°C (300°F) oven for 3–4 minutes to restore their just-baked aroma and gooey chocolate. The crackle of the warm cookie is an unmistakable sign it’s ready.
Top questions about chocolate chip cookies
1. Should I use softened or melted butter?
Use room temperature butter for easier creaming and a better rise. Cold butter won’t blend as well.
2. Can I skip chilling the dough?
Chill the dough for at least an hour; it helps develop flavor and prevents spreading too much.
3. How do I know when the cookies are done?
Bake until edges are golden and centers look slightly underdone; they firm up as they cool.
4. Can I substitute the chocolate types?
Use semi-sweet chocolate chips for balance. Chunky or dark chocolate can add richness.
5. Is it possible to make these gluten-free?
Yes, you can swap out all-purpose flour for gluten-free blends, but expect some texture changes.
6. What if I overbake them?
Overbaking results in dry, hard cookies. Check early and remove when just golden around the edges.
7. Should I add salt to the dough?
Add a pinch of salt to enhance sweetness and chocolate flavor. Too much makes cookies salty.
8. How can I get evenly sized cookies?
Using a cookie scoop ensures evenly sized cookies for uniform baking and appearance.
9. How should I store leftover cookies?
Store baked cookies in an airtight container at room temp for 3 days or freeze for longer.
10. How do I reheat cookies without drying them out?
Reheat in a 150°C (300°F) oven for 3–4 minutes until warm and gooey again.
Baking these cookies is more than just a kitchen task; it’s a little act of care that fills the house with warm, melting chocolate and the scent of caramelized sugar. Each batch feels like a quiet victory, a way to slow down and enjoy the simple joy of a well-loved treat.
Even after all these years, I still find myself reaching for the mixing spoon in moments of need—whether to celebrate, console, or just indulge. These cookies aren’t just sweets, they’re reminders of home, of messy afternoons, and of the imperfect, cozy beauty in every bite.

Hi, I’m Benjamin Reynolds, the creator behind Strategically Seasoning. I started this blog because I believe great cooking is not random. It is thoughtful. It is intentional. It is built step by step with purpose. Seasoning is not something you sprinkle at the end and hope for the best. It is a strategy.

